“Nature is alive and talking with us. This is not metaphor” – Terence McKenna.
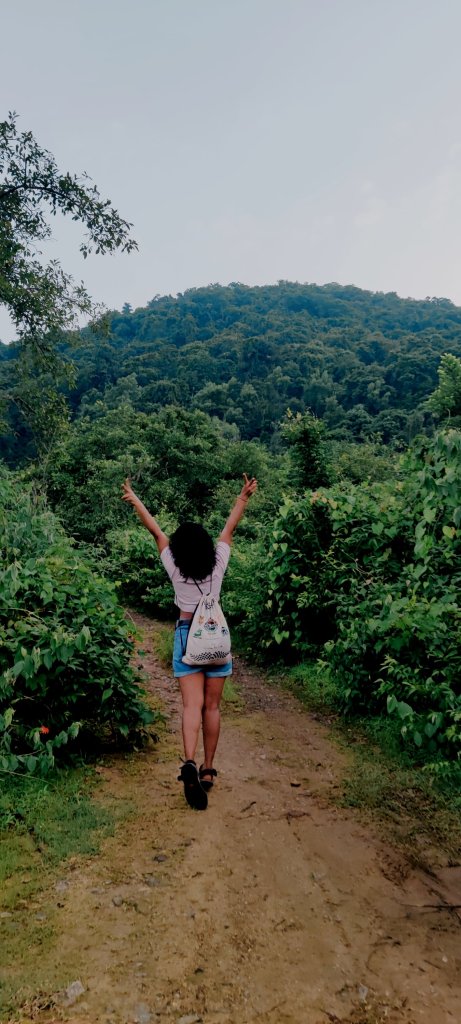
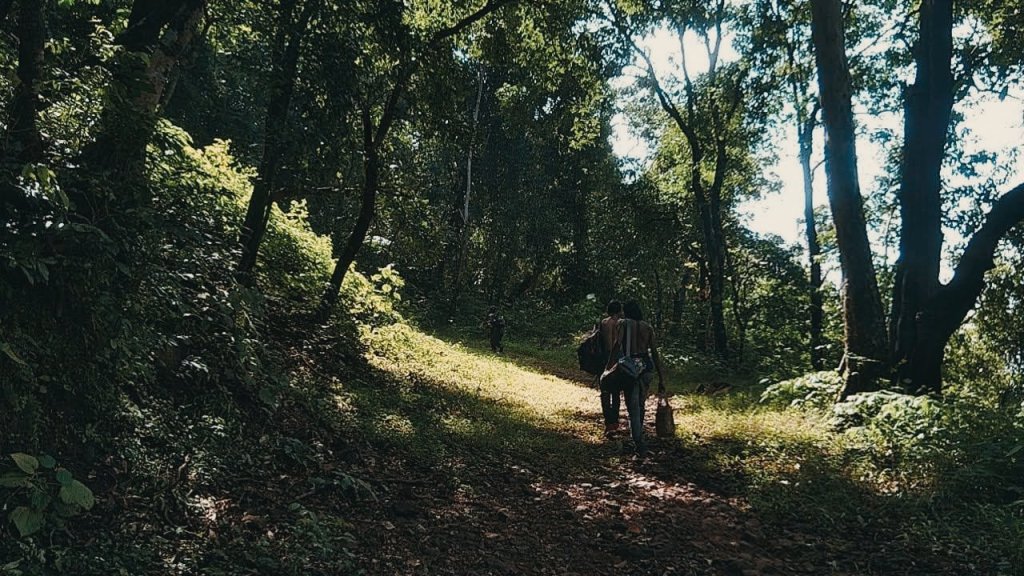
In the early month of July, my friends and I planned to drive down to the countryside of south Goa. We had absolutely no clue where we were heading until, we saw a beautiful mountain and planned to trek on it.
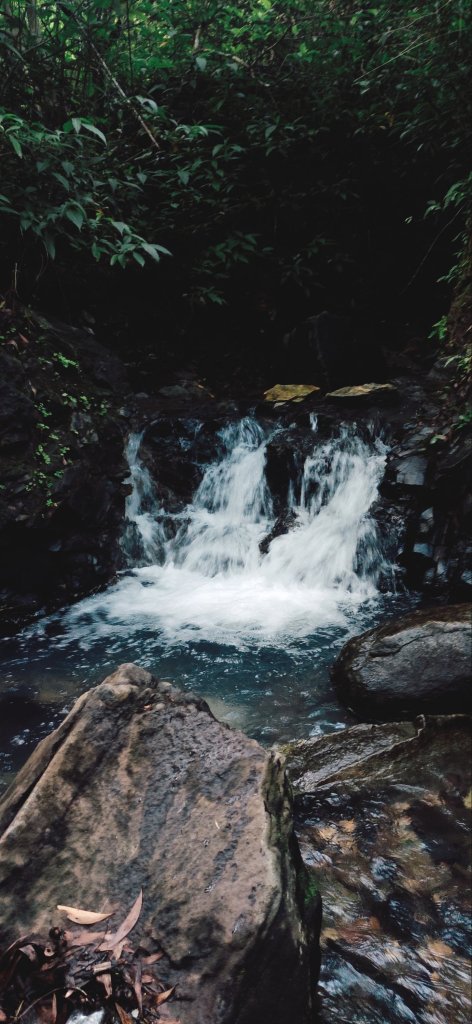
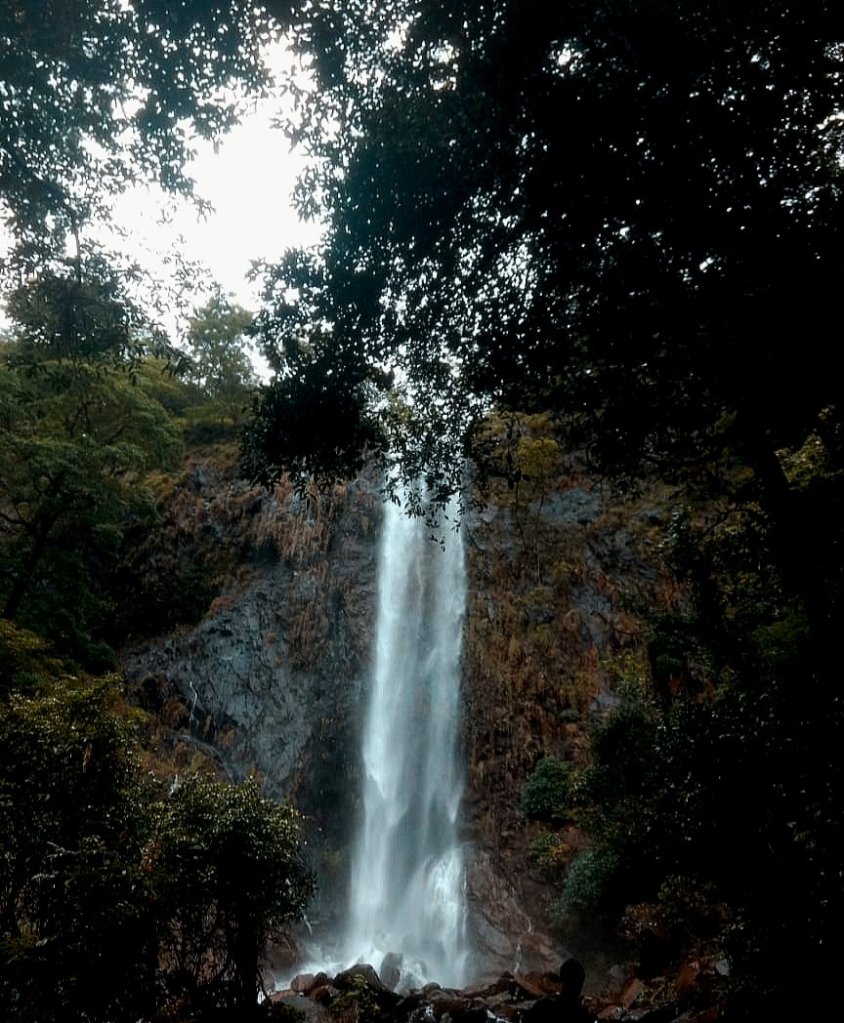
It was few minutes later after we started our trek we heard sound of a water flow and that time we knew for sure that there is a waterfall or a stream close by, we were excited and surely wanted to hunt for a waterfall or stream spot! While we were trekking we heard sounds of peacocks, and other birds chirping. We trekked against the water flow, walked through the mushy land, walked on the marbles, slipped and fell couple of times and finally we reached to a mesmerizing place, where the waterfall was covered with the bushy leaves and water gushed through the rocks gave different rhythm to our soul.
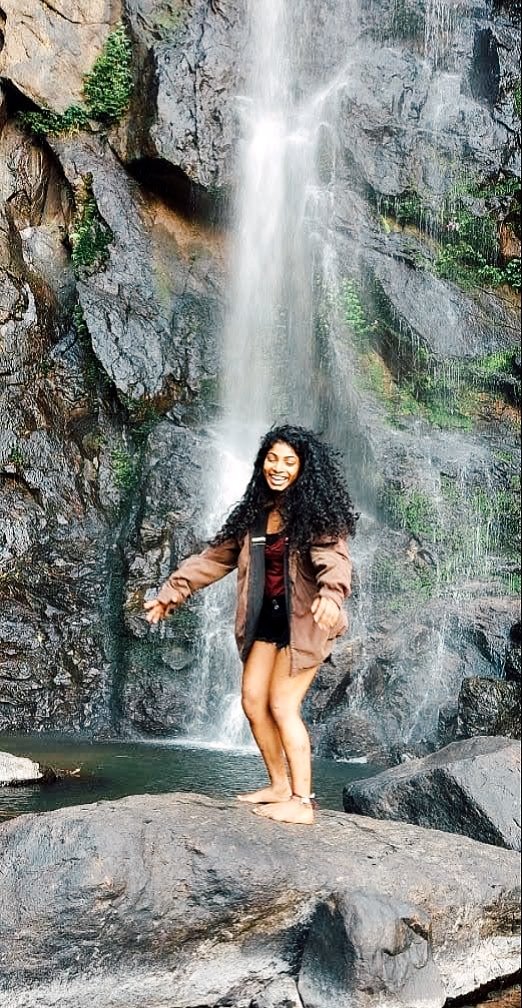
Once we reached there;everything was calm, it was only us and the nature. I sat there silently, peacefully, listening to each and every sound attentively; it simply felt like the nature was trying to convey a message.
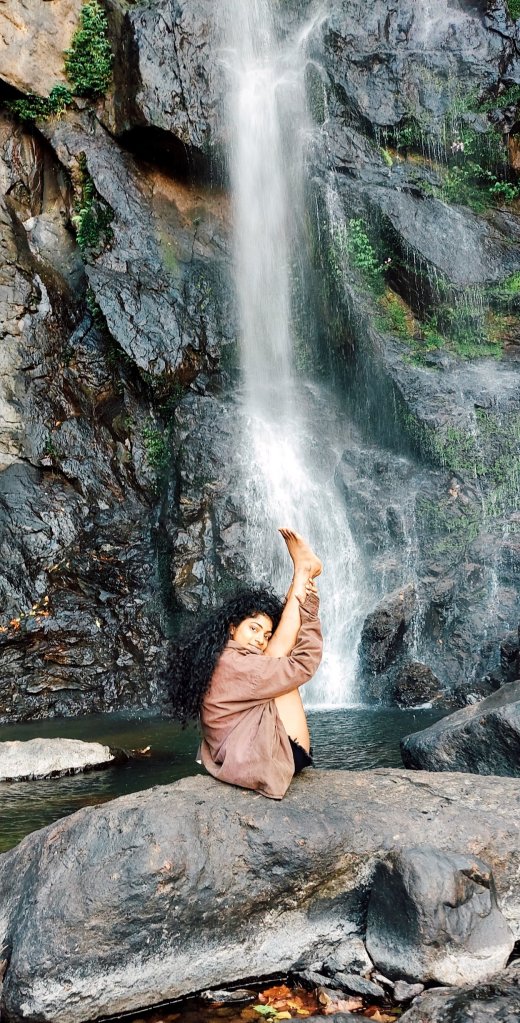
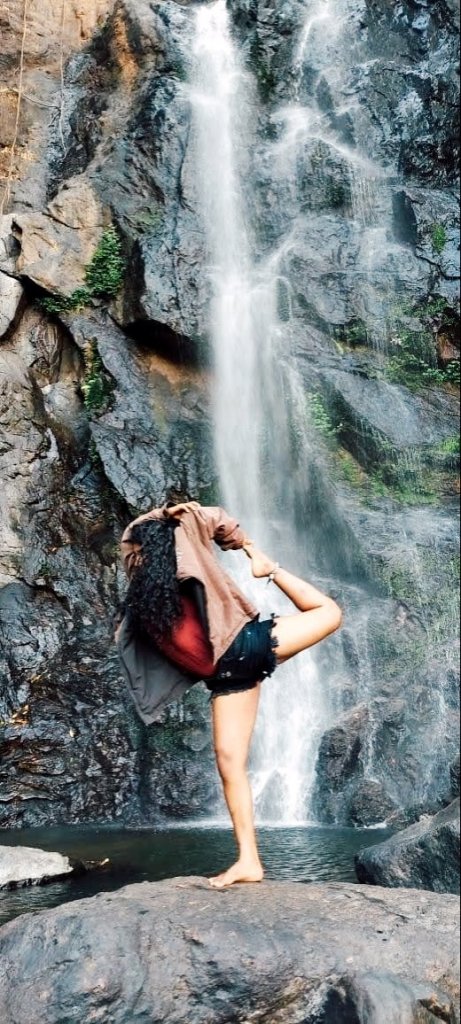
Below are few pictures of the spot..
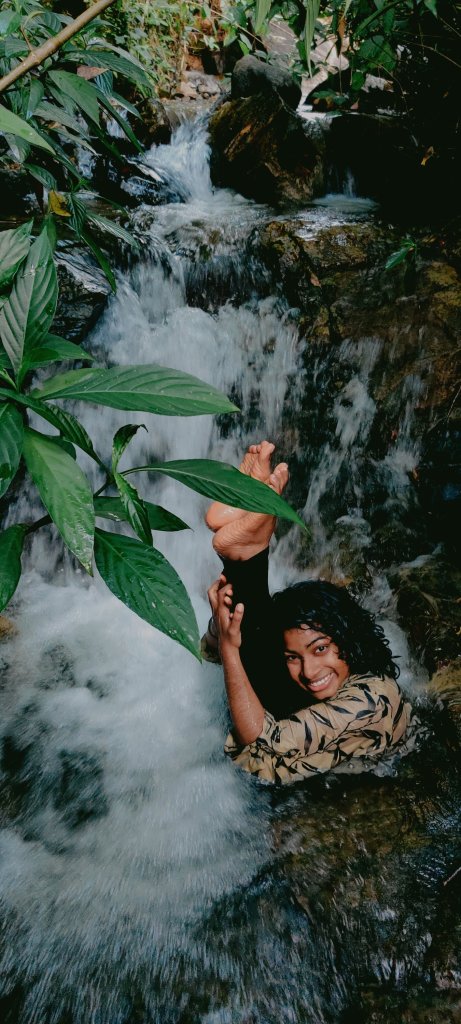
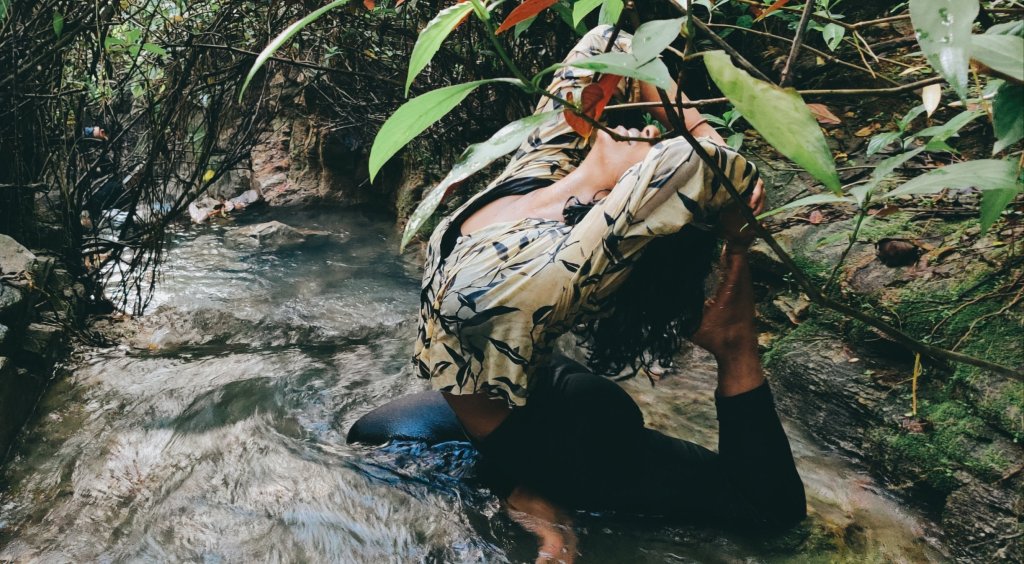
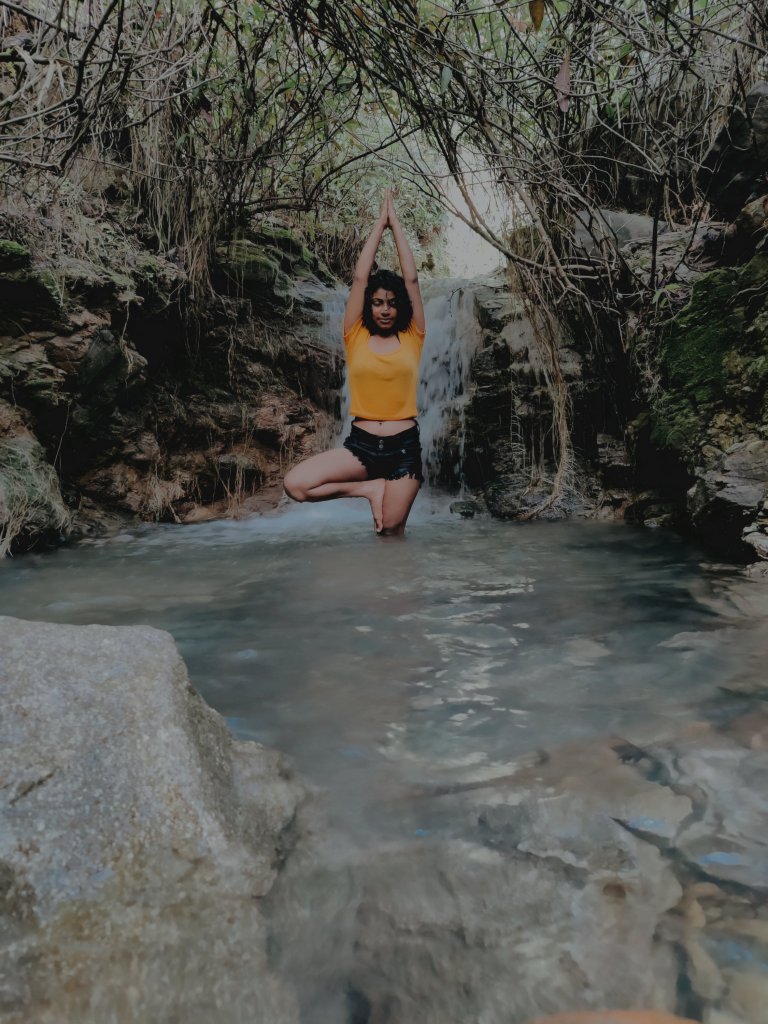
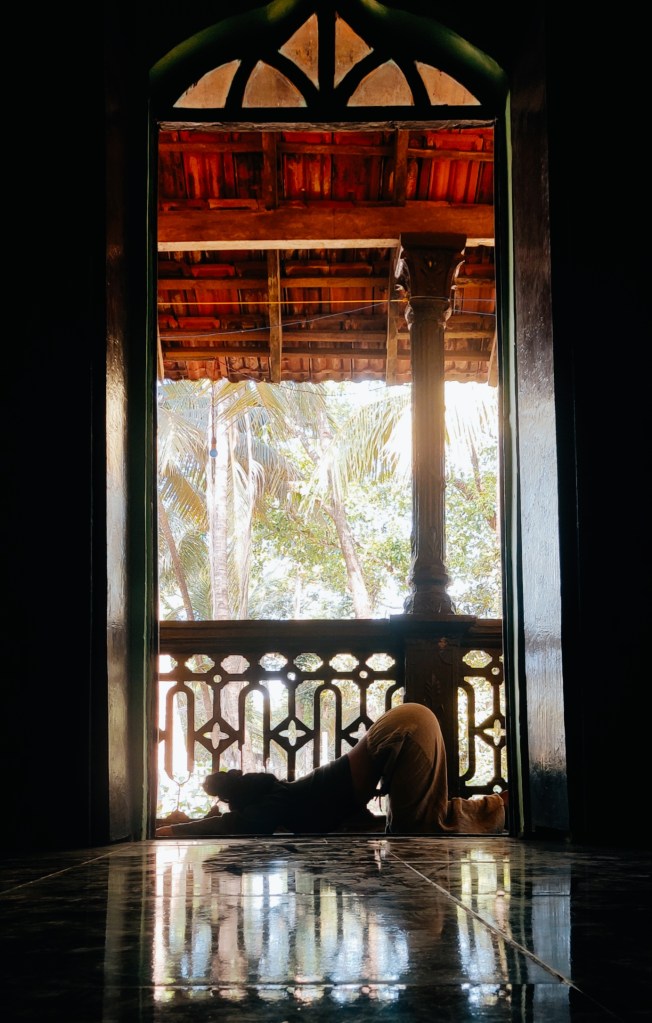
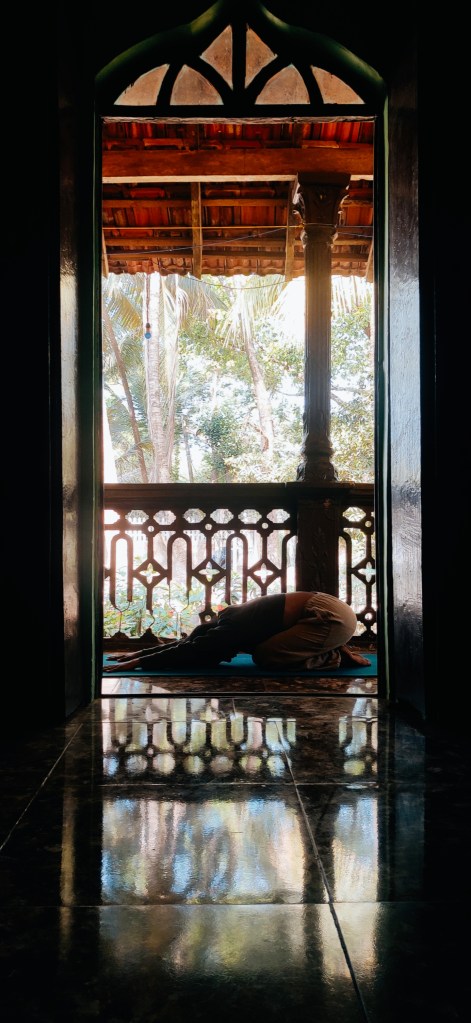
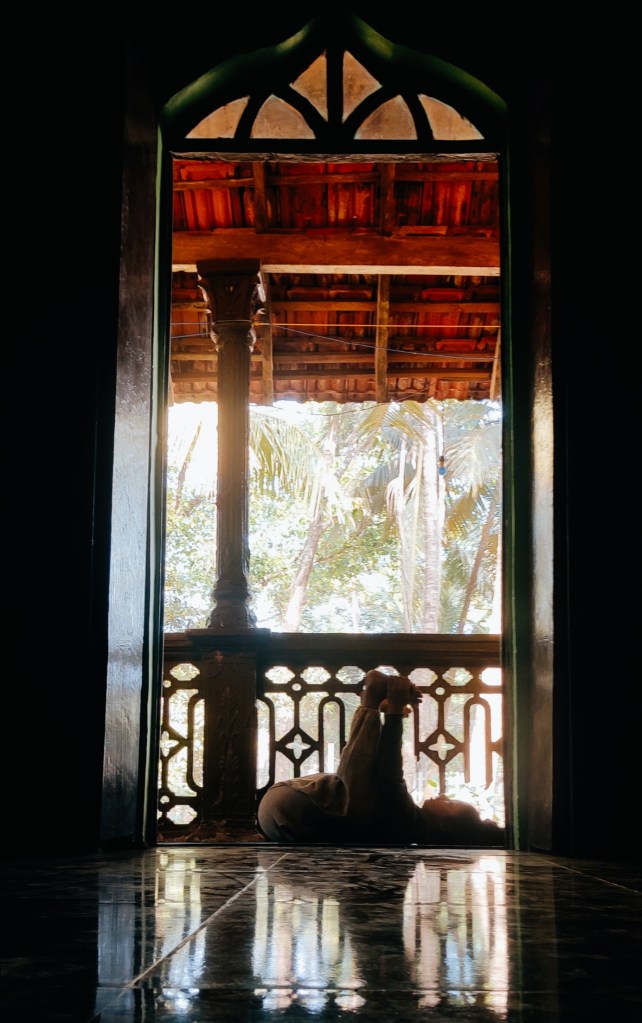
Trail to the mountainMini waterfallWithin the gushing water flow I managed to sit and raise my legs up pointing towards the sky. One legged King Pigeon PoseVrksasana (tree pose)
LOCATION📌: BEAUTIFUL HUMANS, I WON’T MENTION ANY LOCATION HERE. GO FIND YOUR WAY TO THE WATERFALL, WHAT’S THE FUN IF YOU ALREADY KNOW THE LOCATION AND YOU GO TO THOSE PLACES WHICH HAVE ALREADY BECOME MAINSTREAM? YOU WILL DEFINITELY NOT ENJOY THE TRAIL, TRUST ME.. GETTING LOST AMIDST THE FOREST AND FINDING AMAZING SPOTS IS ONE ACHIEVEMENT YOU’LL EVER WANT TO EXPERIENCE!
“While people are struggling unhappily in the cities against the cruel authorities, a waterfall happily and cheerfully flows in the nature; there is happiness only if there is freedom!”
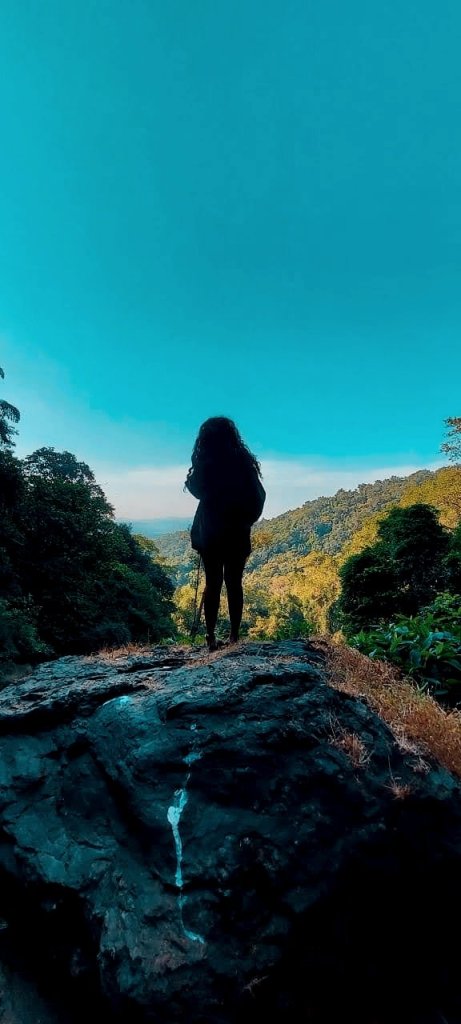
On the peak of the mountain
Hey! I am Yannisa, a girl living in a small state, Goa- India. Goa is the most incredible place to live. I’d say I’m blessed with abundance of greenery beauty, waterfalls, beaches, plenty vegetation, lushy green forest, wildlife etc.. Our ancestors have reserved so much of natural resources for us by using it efficiently and wisely. I believe it’s indeed our duty to keep our mother Nature the same way they have kept for us thereby, delightfully enjoying living the same way with our future generation.
Finding our way out in the nature, we planned to drive to Netravali wildlife Sanctuary, hoping we could find some stream or a waterfall to spend our day.
It was a cloudy day: weather being nice and pleasant! The drive lasted for 2hrs and when we reached to the Netravali wildlife sanctuary gate, it was closed! We were not allowed to enter, the forest department people had closed the gate for visitors however, it was open only for village people. That’s when we were disappointed but we knew one thing for sure we wouldn’t turn and go back home. We were surely going in search of another place.
Within no time 15 mins away from the place we left, we found a mire narrow road. We entered that path which led us to a beautiful village. The villagers were very gentle and greeted us with a warm smile, when we were getting out of the car, they told us that there is a waterfall ahead and on the peak of the mountain there is a temple. We instantly felt welcomed and fortunate! The place had started giving us good vibe already. So, we parked our car and trek for 45mins.
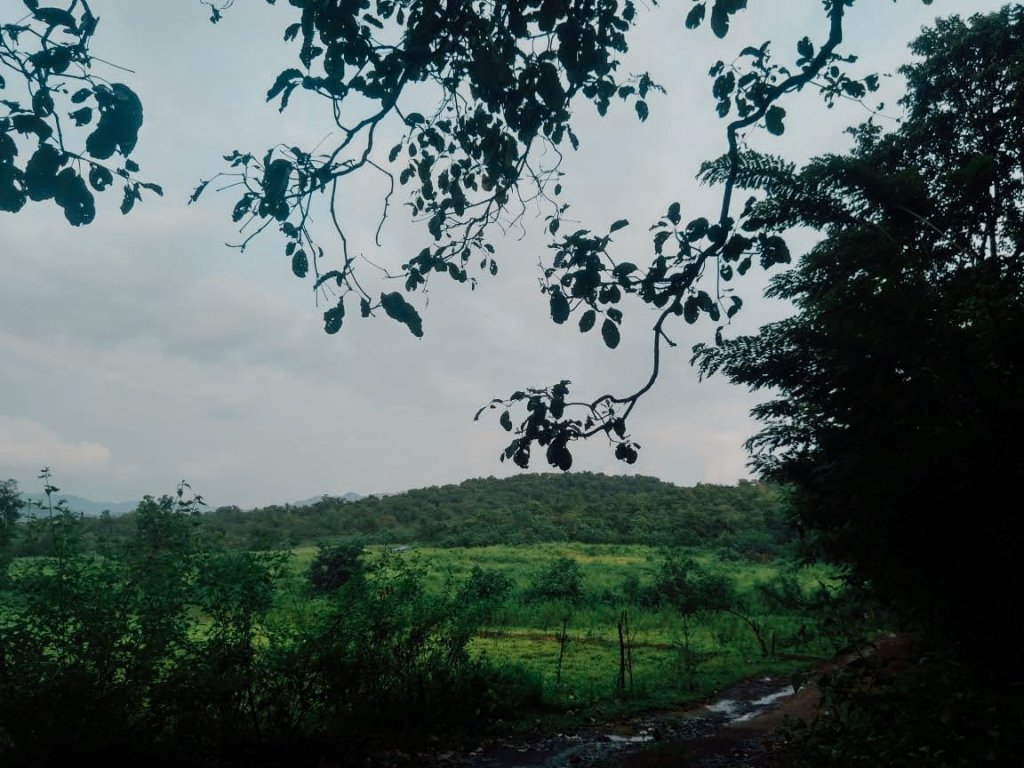
The village we arrived.
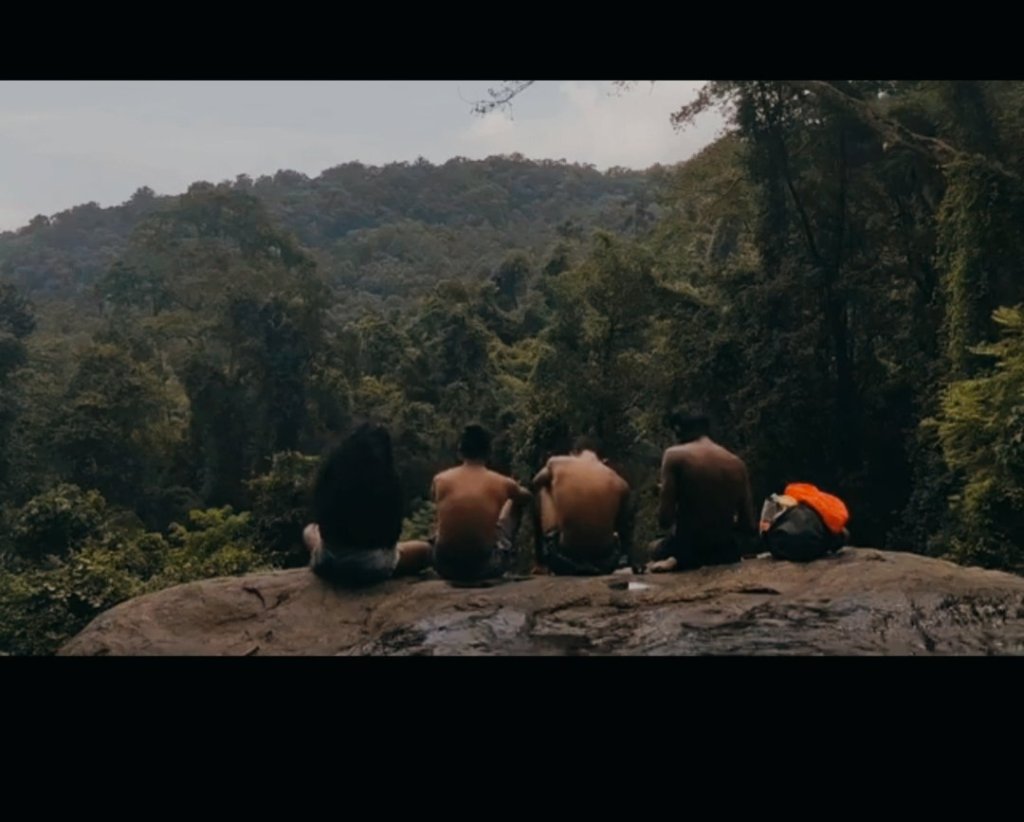
The trek was simply blissful surrounded by a dense forest, climbing high the mountain we were certainly blessed with an intriguing view, each step felt so magical and as we were approaching to the waterfall the path was getting narrow and suspicious because honestly, we didn’t know much about the place. when we reached the waterfall, we couldn’t just take our eyes off. The view was just astounding rather beyond words!! There was no-one there except my brother and two of his friends.
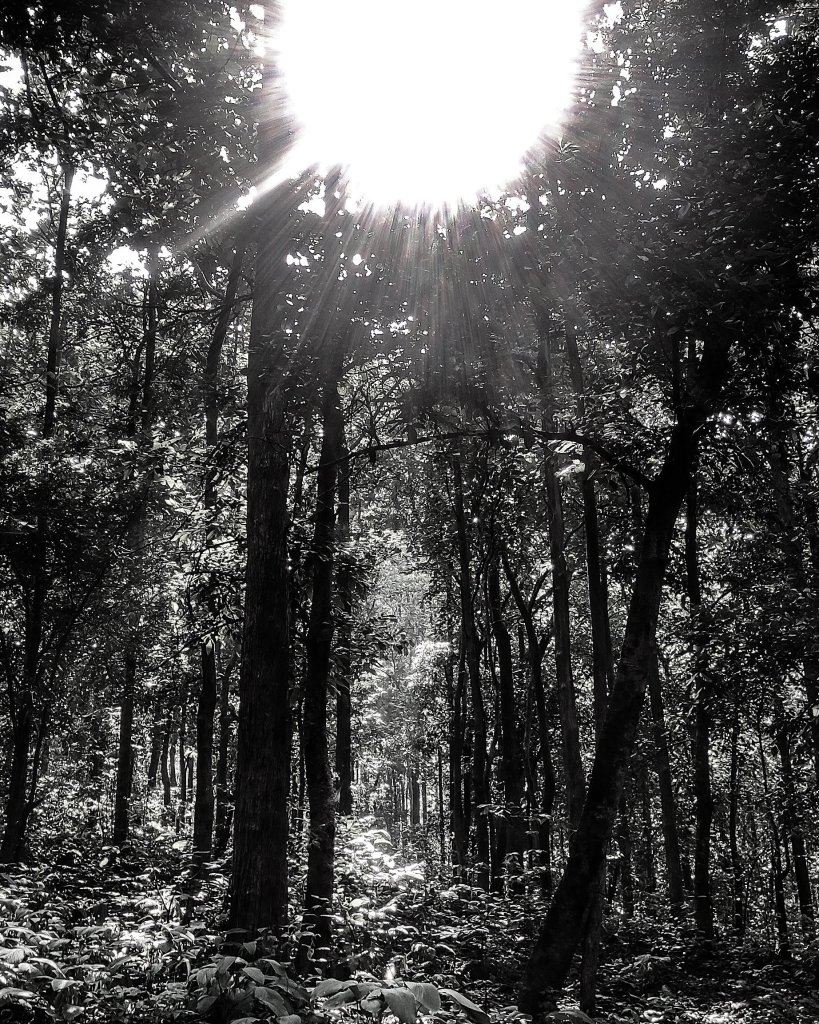
Between the Lushy green brush lit up a shining sun.A Trek to the mountain.
We were just enjoying our time with the nature, listening to the sounds of the waterfall, the breeze brushing through our hair, the animal’s cheerful voices and bird’s singing was just soothing to our soul.
The Secret Waterfall.The infinity pool with a marvellous view.phenomenal place where monkeys would hang out.
later, we had our lunch. Thanks to my mom for waking up early in the morning to cook food for us so we could enjoy our meal !!
Oh what a relaxing place!
Besides having fun in the nature, practicing yoga near this majestic waterfall was certainly therapeutic! Each breath relieved like a sigh has water flowed down from the heights. And has Buddha says “Do not dwell in the past, do not dream of the future, concentrate the mind on the present moment.” The present moment is however precious, at that time everything felt so warm and that really felt like living, truly living life!!
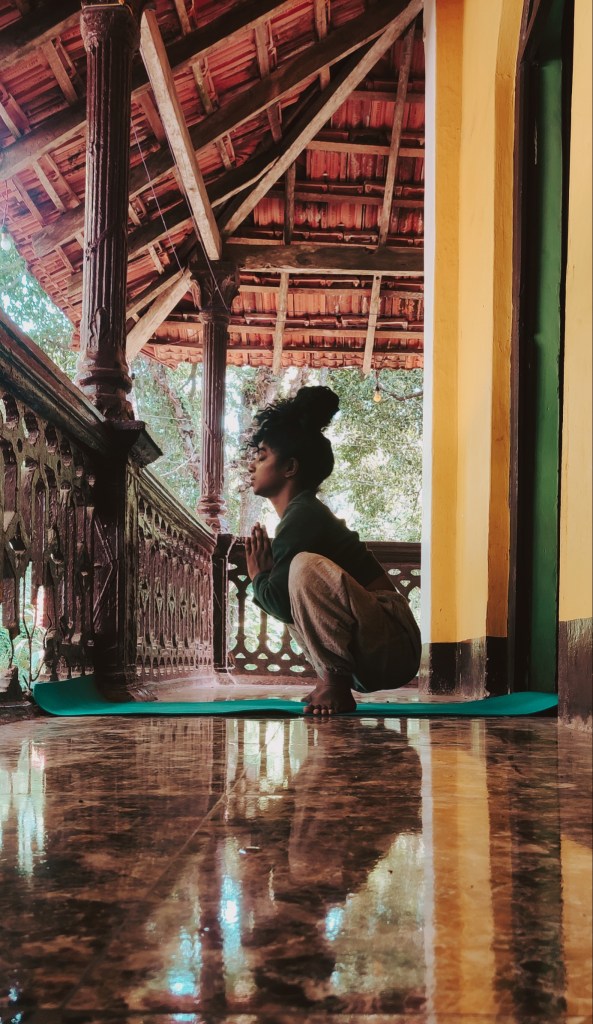
Yoga pose in spiritual relaxation serenity..Connecting nature with breathing.Supernatural smile is always a precious one!It was just an amazing adventure!!
After a while, when the sun was setting down, we made a move to get back to our car because it was getting dark and none of us had carried a torch. Oh, what a tiring but an amazing adventurous day; we shall always cherish!!
Kind Note: to those who love nature and love venturing around these kind of places. A humble request- please see that you go with a kind, loving and passionate heart! Do not litter such places.. Do not play loud music because there are wild animals living, it’s their natural habitat. Importantly, respect theplace!
I hope you enjoyed reading the blog. If you did then, please show some love Thank you!!
“Travelling solo does not always mean you’re alone. Most often, you meet marvelous people along the way and make connections that last a lifetime” -Jacqueline boone
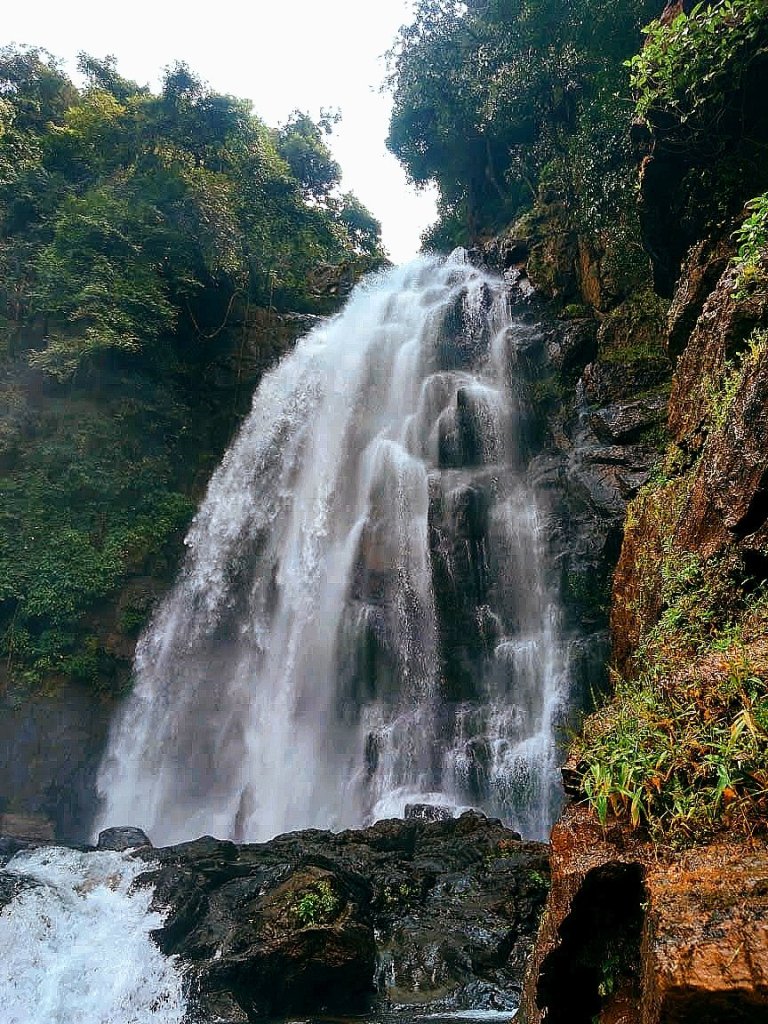
Kuskem Waterfall
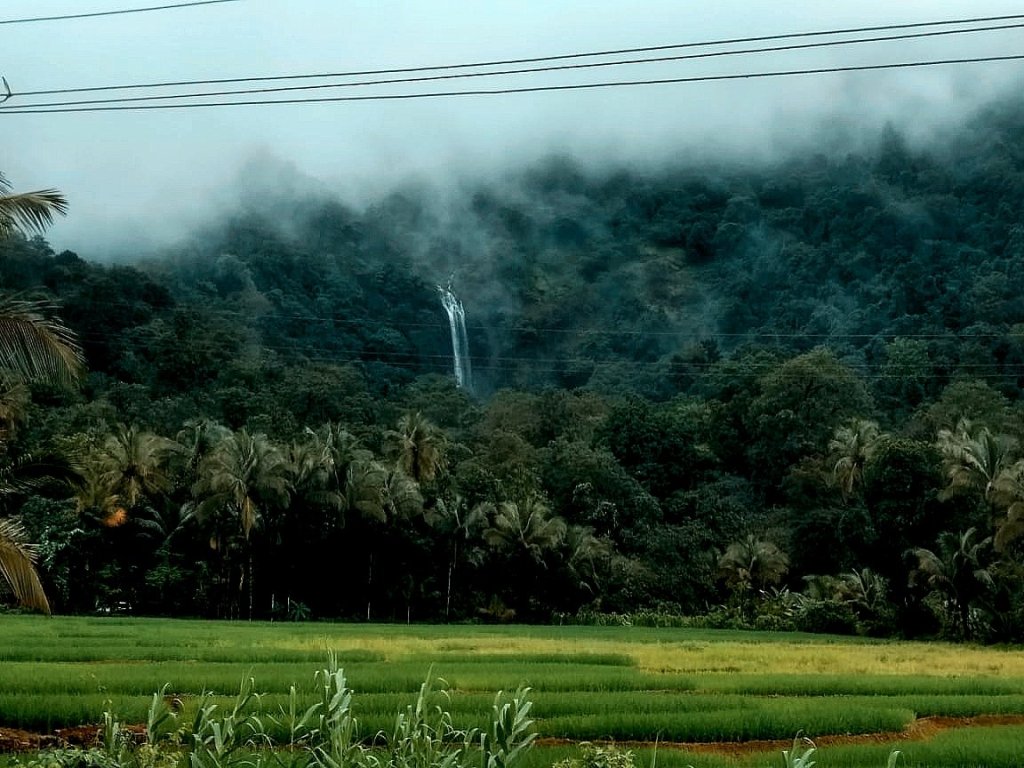
Clouded sky and cosy weather are so peaceful when embraced with the nature around. At such times, going on a long drive, listening to country songs is just a brilliant idea! Being located on western Ghats, Goa is blessed with many magical waterfalls, Kuskem is one such breathtaking hidden gems I have visited. It is situated in Cotigao wildlife sanctuary in Canacona. Cotigao is a home to number of species of animals and birds as well as ancient trees. This area is veritable for nature lovers with abundance of vegetations and perennial streams, which continue to delight the visitors on the way to the waterfall.
There is an amazing two-kilometer trek through thick vegetation. While your trek begins, you can hear the enchanting sound of gushing water flowing through the rocks. Once you reach up the waterfall you can see mist formed all over and milky water flowing from great height surrounded by the greenery. Usually white, the water turns green during the peak of monsoon, but this slight is still beautiful.
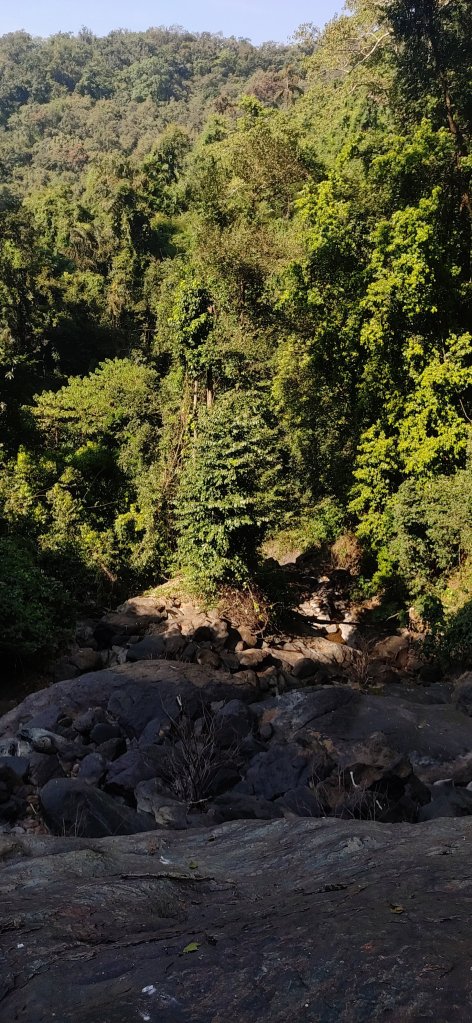
View from the main road
This waterfall has been developed for eco-tourism, it is administrated by the forest department and liquor is prohibited on the site. Plastic is also forbidden and dustbins have been placed at regular intervals to help ensure the place remains clean.
The locals are also taking very good initiative to maintain this place. The locals are shy to talk. But when approached they’ll be happy to tell you about their culture, traditions and lifestyle. The people who live here are tribe of velips. They grow their own veggies like ladyfinger, tambdi bhaji, cucumbers, Palak, and many more “since the city is too far for us to buy certain things, we consume more vegetable than meat”. One of the locals informs.
Not many people are aware of this waterfall and pristine site it has to offer, but it’s truly a lovely place to visit during the monsoon. However, the young tourists to this place is growing. Nature lovers are advised to visit this lovely waterfall only in monsoon season has it’s truly a gem during monsoon. This magnificent waterfall is 30m high, surrounded by a plently of vegetation and wildlife.
Summer season was gone, the gloomy sun, the beautiful sunsets were spectacular during summer time and I’d surely miss them But little did I know that I was really excited for monsoons .The sky being a source of an incredible indication that rainy season had approached. It was a beautiful evening, pleasant weather and certainly the perfect time to practice my yoga.
“It’s interesting how amazing all yoga poses have a certain name and certain significance related to them”.
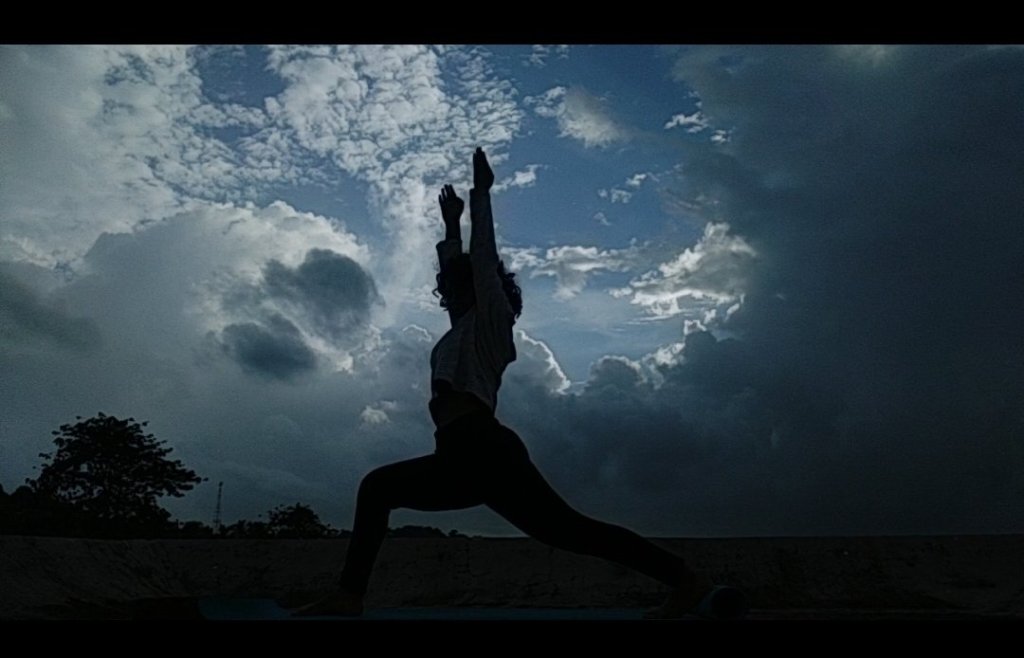
In today’s blog, I’m going to speak about Veerabhadrasana / Virabhadrasana- Warrior Pose
This pose strengthens the arms, shoulders, thighs and back muscles, all in one go. This pose is named after Veerabhadra, a fierce warrior, an incarnation of Lord Shiva. The story of the warrior Veerabhadra, as all stories from Upanishads, has a moral that adds value to our life.
• Strengthens and tones the arms, legs and lower back. • Improves balance in the body, helps increase stamina. • Beneficial for those with sedentary or deskbound jobs. • Extremely beneficial in case of frozen shoulders. • Releases stress in the shoulders very effectively in a short span of time. • Brings auspiciousness, courage, grace and peace.
Contraindications of the Warrior Pose (Veerabhadrasana) • Practice Warrior Pose (Veerabhadrasana), if you have experienced spinal disorders recently or just recovered from a chronic illness, I’d advise you to consult with the doctor first. • High blood pressure patients should avoid this posture. • Veerabhadrasana especially benefits pregnant ladies in their second and third trimester provided they have been practicing yoga regularly. Practice Virabhadrasana while standing close to a wall so you can support yourself if required. • Avoid this posture if you are suffering or had recently suffered from diarrhoea. • If you have knee pain or arthritis, use some support at the knee to hold this yoga posture.
Steps to perform Warrior 1 • Stand in mountain pose, then get into hastapadasana (the hands-to-feet pose). Bring your left leg behind and right leg at 90 degree. Once achieved a correct posture slowly try to exhale while your hands are perpendicular towards the floor. • Inhale, and gentle lift your both hand parallel facing towards the sky raise your neck towards the sky or you can keep your neck neutral to your shoulder level. • Exhale bring your both hands down and get into hastapadasana. • Do this for the other side as well. • Stay in this position for 30sec. • Do this 3 times in a sequence.
Warrior I Pose
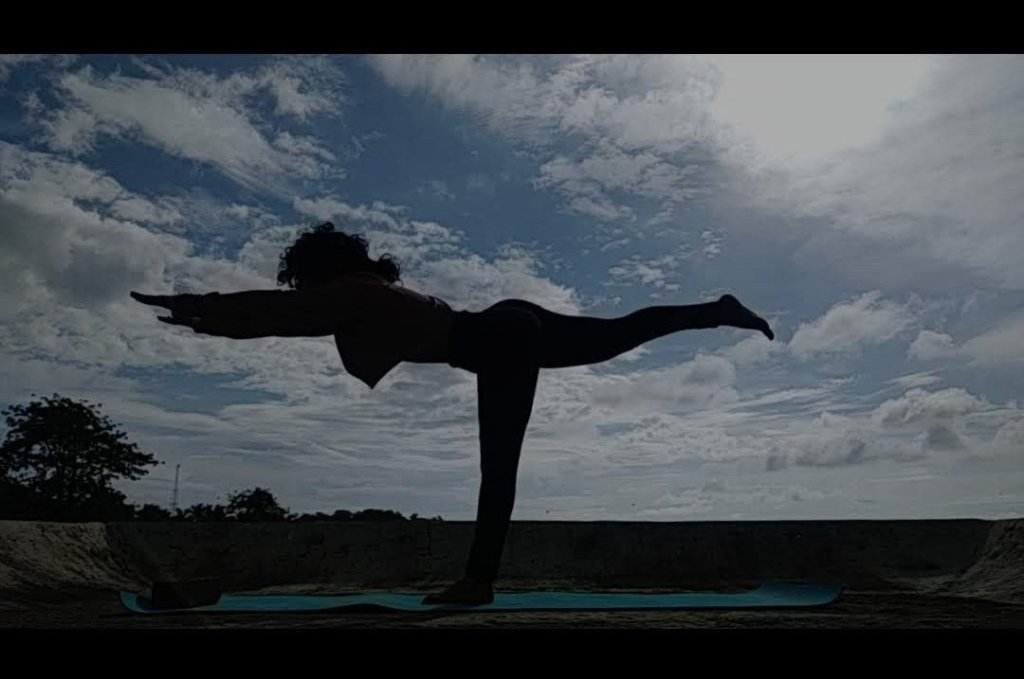
Steps to perform Warrior II
• If you’re starting to do warrior II, stand straight with your legs wide apart. Exhale, extend right feet forward, keeping it at 90 degree, bend into a lunge. Be sure that your knee is pointing over your toes and your back feet remains behind. • Repeat this on the other side as well. • Hold for 30 secs. Repeat it 3 times. • If you’re in your vinyasa flow then from hastapadasana take your right feet forward, maintaining 90 degrees, then bend into a lunge. Therefore, being in warrior I position. From there slightly, twist hips towards your left, with both arms extended straight out from your side. • Do the same for the other side as well.
Warrior I I Pose
Steps to perform Warrior III • Begin by standing straight, your front leg with a slight lunge and back leg straight at the back of your heel lifted, while keeping your hands joined to the heart try to lift the back leg at 90 degrees and slowly extend your hands forward and gazed downward. • Remember to inhale and exhale. • Do the same for the other leg • Try to hold this posture for 15-20secs. • Repeat this asana 3times.
Have you ever tried having Hummus? Or did you try to make one and it didn’t turn out well? Do you want to know how to make a smooth, mouth-watering hummus? Well, keep reading my blog and I shall tell you eventually!!
Hummus is one of my favorite dip or spread I have with my appetizer, my veggie rolls, sandwiches and lots more. It’s smooth, delicious and healthy. Many vegetarians and vegans prefer this amazing dip and spread because it’s high in plant base protein. It’s very easy to make and you can store it in a fridge for about 5-6 days.
A LITTLE BIT OF HISTORY
Hummus is probably one of the best known Middle Eastern foods due to its popularity worldwide… However, the debate still goes on from where it was originally originated whether it was Greek or Middle Eastern country is not known for sure. But according to several historical sources, the earliest mention of hummus dates back to Egypt in the 13th century.
The word hummus comes from the Egyptian word for chickpeas, the typical primary ingredient, although lots of other beans can be used instead. Variations of the modern-day hummus recipe can be found as early as the 13th century in Egyptian recipe books.
Hummus is typically served as part of an appetizer or alongside falafel, eggplant, and tahini sauce. Fresh or toasted pita bread, as well as freshly chopped vegetables, can be dipped into it. It also makes a filling and nutritious snack.
It’s often flavoured with spices, such as cumin or sumac, and can be served garnished with olive oil, chopped tomatoes, cucumber slices, parsley, pepper, mint leaves ,chickpeas, and nuts.
Why you should try having Hummus!
Hummus provides a wide variety of vitamins and minerals. It is also a great plant-based source of protein. Hummus is rich in Calories, Fat, Protein, Carbs, Fiber, Manganese, Cooper,Folate, Magnesium, Phosphorus, Iron, Zinc, Thiamin,Vitamin, Potassium.
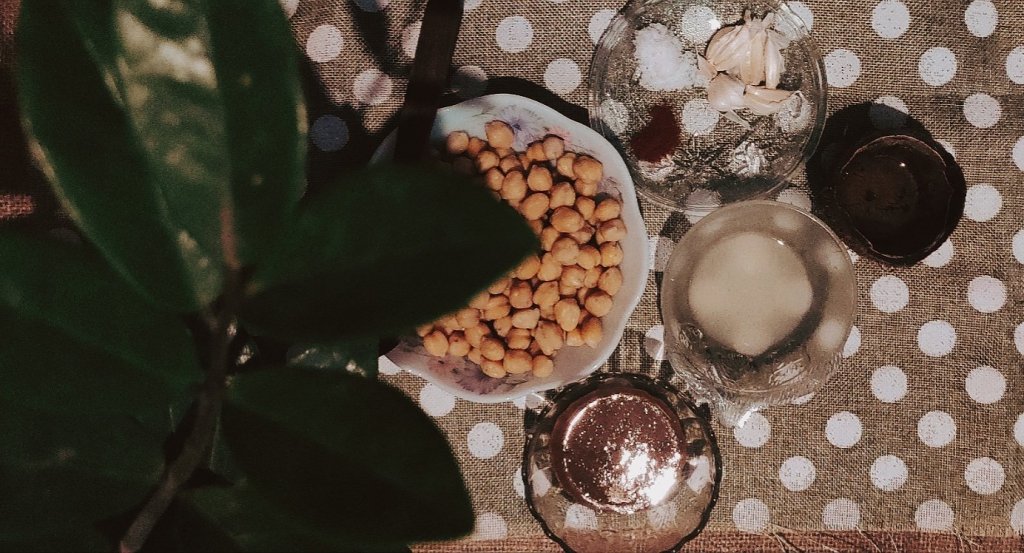
Ingredients
What all will you need.
2 cups of chickpeas, or garbanzo beans
3 to 5 tablespoons lemon juice, depending on taste
1 1/2 tablespoons tahini, sesame paste
3-4 cloves garlic, peeled and crushed, toasted in vegetable oil
1/2 teaspoon salt
2 tablespoons olive oil
1/4 tablespoon red chilli powder
Handful of fresh coriander or mint leaves, optional garnish
All the ingredients required for hummus
Steps for preparations
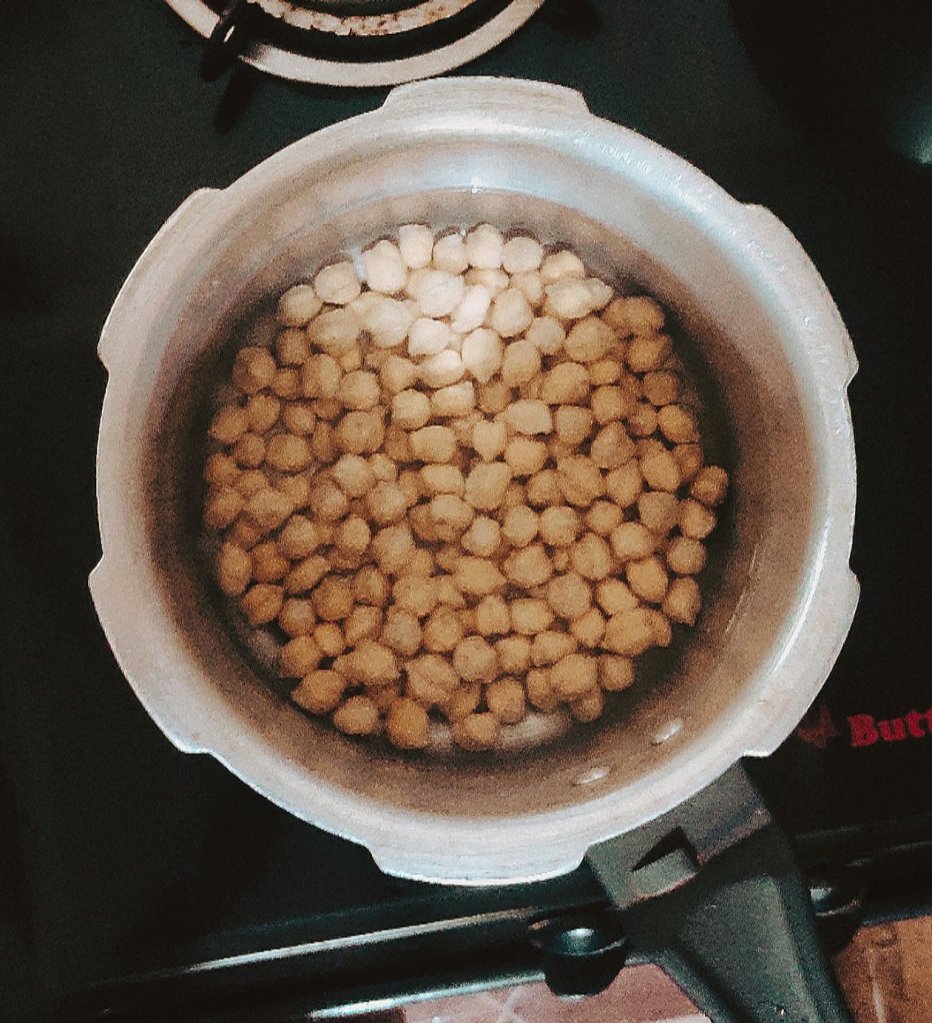
# Use freshly boiled chickpeas –The best hummus comes from using freshly boiled chickpeas and not canned chickpeas. So yes, do take some time to soak chickpeas and then cook them. Soak the chickpeas for 8-9 hours or leave it to soak overnight. A pressure cooker is great resource for cooking chickpeas thus saving time. I always cook soaked chickpeas in a pressure cooker as its quick and does not take a long time. It takes approx. 4-5 whistles to get the chickpeas done..
#Cook the chickpeas really well– to get a nice creamy smooth hummus, the chickpeas have to be cooked really well till it become mushy. They should be easily mashed when you press them between your fingers. Any raw bits in the chickpeas, can ruin the hummus. Also, if there are any brown chickpeas try avoid using them.
Boil chickpeas in a pressure cooker inorder to save time
#Peeling chickpeas or not – Some hummus recipes peel of the chickpeas. Now peeling chickpeas takes a lot of time. I don’t usually peel chickpeas when making hummus. Even without peeling them you can get a smooth hummus. But if you want a really super smooth hummus, then take some time out and peel the chickpeas.
#Tahini vs sesame seeds – both tahini and sesame seeds work very well while making hummus. I have used both tahini as well as sesame seeds at different times – and both of them give a good taste. So, in this recipe you can add either tahini or sesame seeds.
Tahini sauce (sesame seeds paste)
#Olive oil – one of the ingredients that I always recommend while making hummus is olive oil. It gives an amazing flavour and taste.
DIRECTIONS
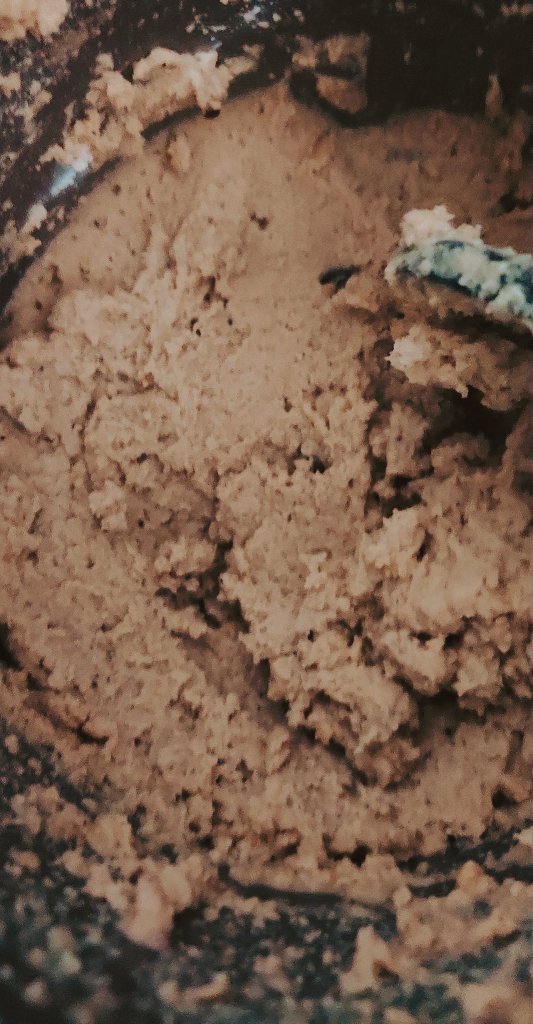
1)Add all of the ingredients, to a food processor (blender)and blend on high, stop occasionally to scrape the sides. Continue until a smooth consistency is achieved. The longer it’s left to blend, the smoother it becomes… I usually keep for 5-6 mins.
Add all the ingredients to the blender or food processor.
2. Taste test the hummus. If you’d like the consistency to be creamier, add more olive oil or tahini or you can add more lemon juice according to the taste you prefer or desire to get.
Grind until achieved the desired consistency.
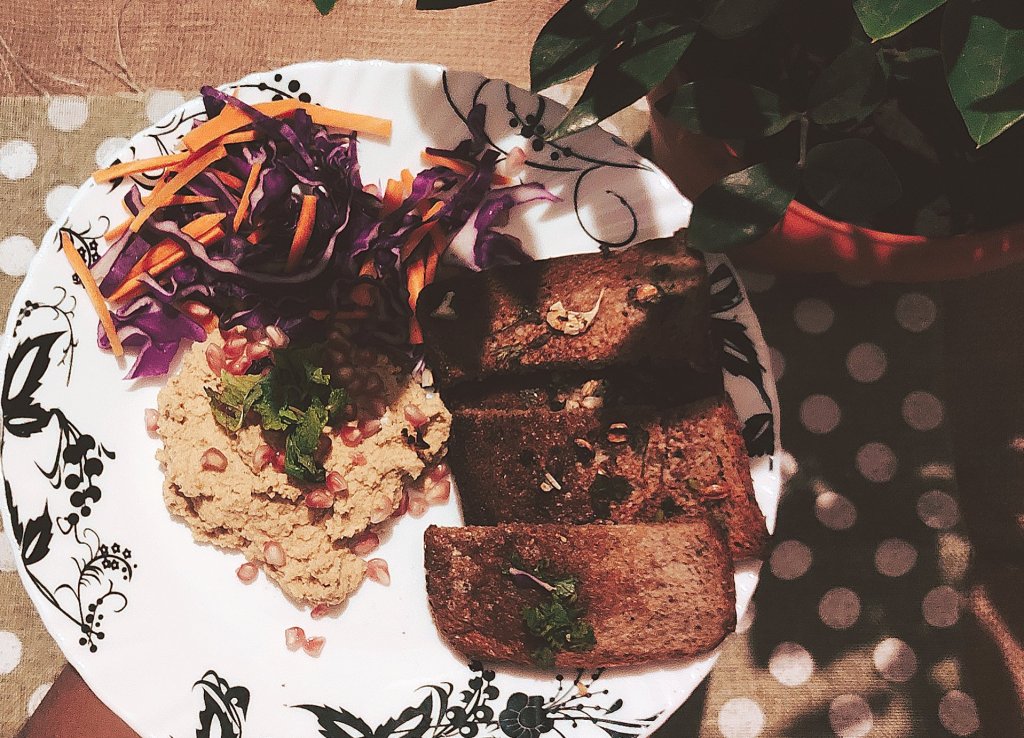
3. Once achieve the desired smooth hummus- Plate, garnish, and serve!
Hummus is ready to serve.
*Additional *
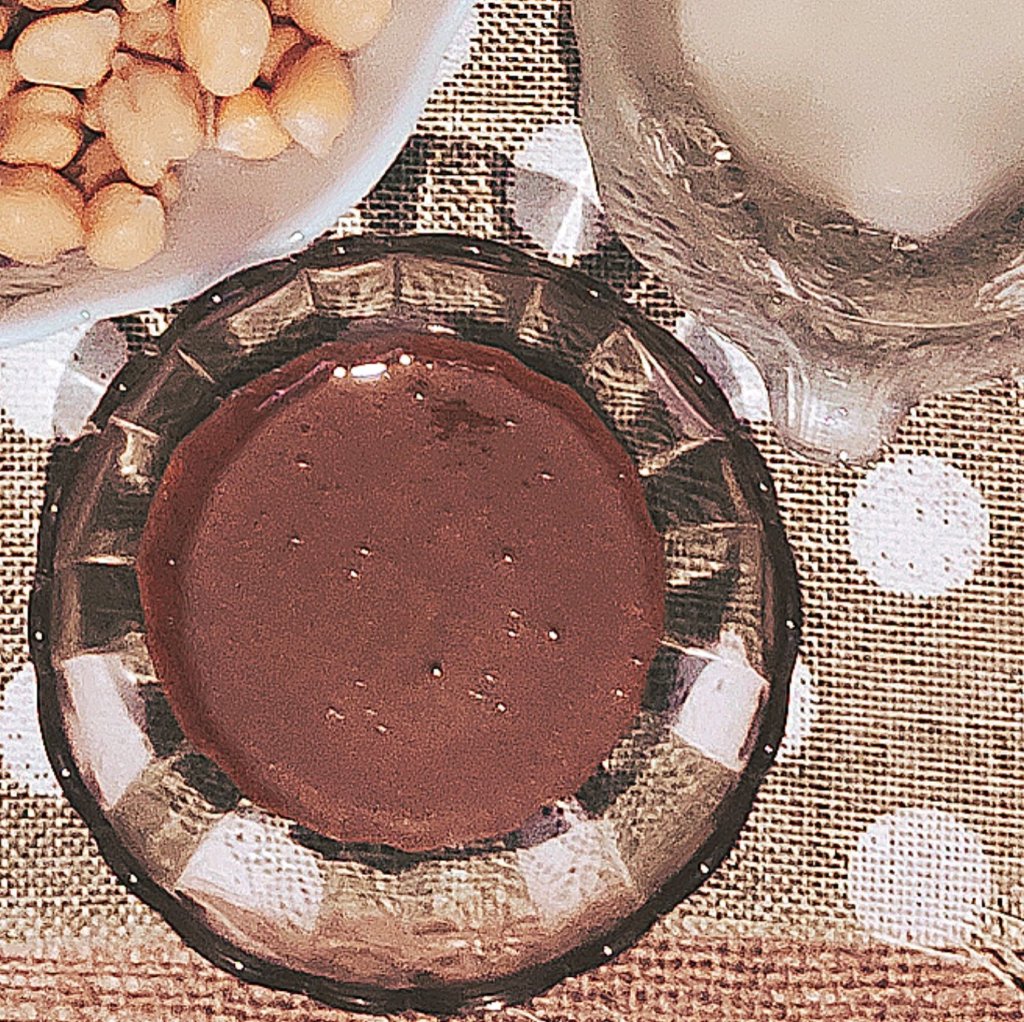
Tips on How to make Tahini sauce
Here are the following instructions on how to make Sesame seed paste or rather Tahini sauce.
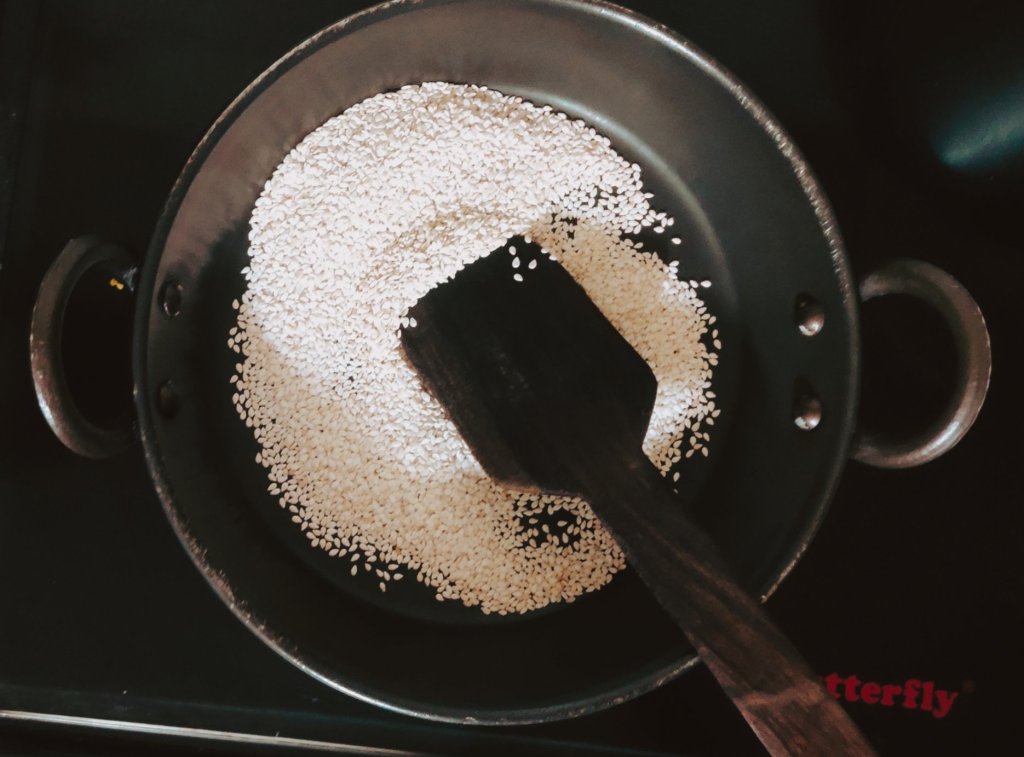
1) Roast the Sesame seeds (til) on the fry pan. Keep on medium heat.
Roast the sesame seeds in the fry pan.
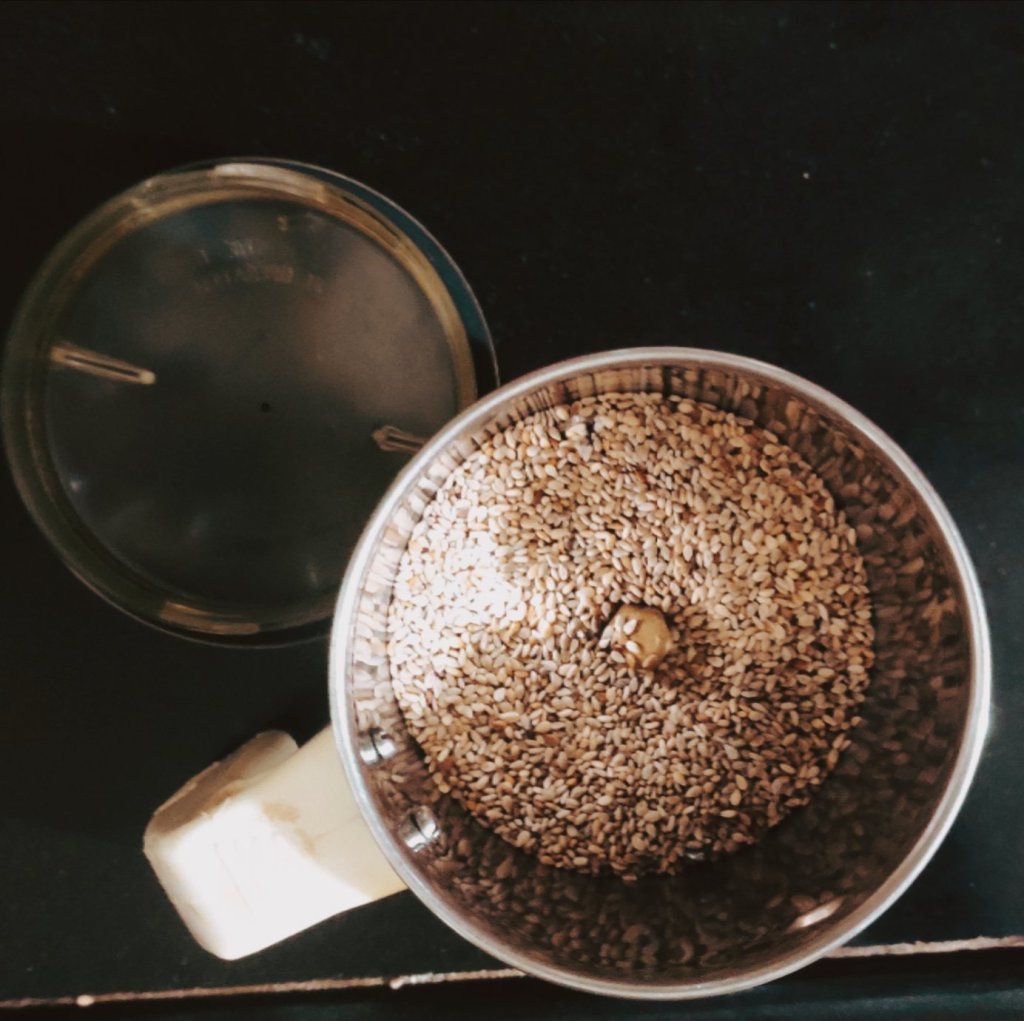
2) Once the seeds turns slightly golden brown, put the flame off and transfer it to the mixer jar or a blender.
Grind the roasted Sesame seeds.
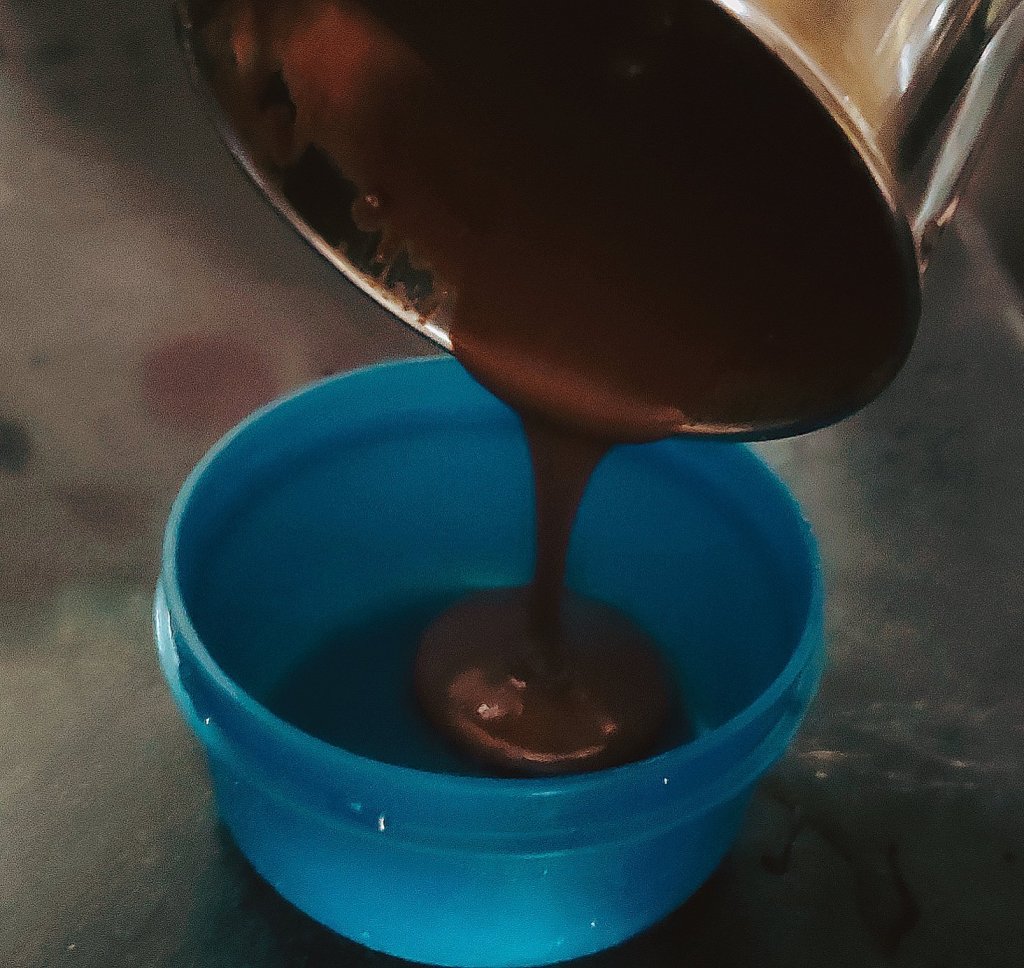
3) Blend it till you achieve a smooth tahini paste. And your Tahini sauce is ready!!!
Smooth blended tahini sauce.
That’s how easy it is to prepare Hummus. Do give it try!!
Thank you and much love to everyone who’s reading this post:)
Are you one of them who skip breakfast very often? Are you lazy to cook breakfast? Hold on, I’ve got some easy delicious healthy smoothie recipe for you guys…
But first let me tell you, why is breakfast important and why you should not skip this meal!!
Breakfast is often called ‘the most important meal of the day’, and for good reason. Breakfast breaks the overnight fasting period. It replenishes your supply of glucose to boost your energy levels and alertness, while also providing other essential nutrients required for good health. Your breakfast foods must be rich in key nutrients such as folate, calcium, Vitamin B, and fibre. Breakfast provides a lot of your day’s total nutrient intake.
What happens if you don’t have your breakfast-?
Studies have shown that those who are most likely to skip their breakfasts are older females, and people who: • are under or overweight • have a poor diet • have lower physical activity levels • do not get enough sleep • are from single-parent or lower income households.
Some common reasons for skipping breakfast include:
• not having enough time or wanting to spend the extra time being in bed • trying to lose weight • too tired to bother • bored of the same breakfast foods • don’t feel hungry in the morning • no breakfast foods readily available in the house • the cost of buying breakfast foods • cultural reasons.
While skipping breakfast is not recommended, good nutrition is not just about the number of meals you have each day. If you don’t have breakfast, aim to make up for the nutritional content you missed at breakfast with your lunch and dinner.
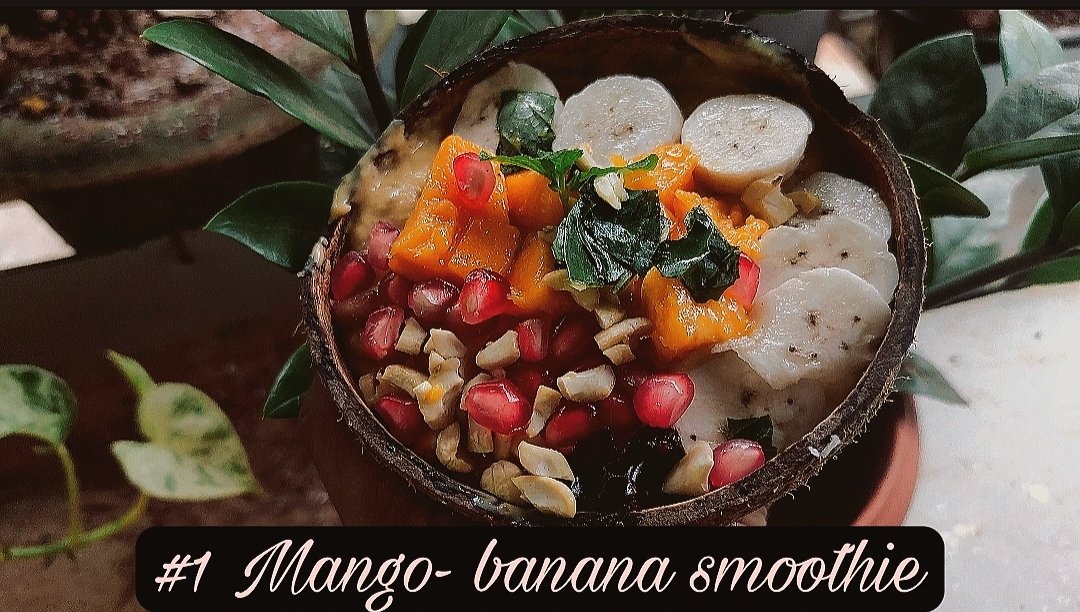
So, here are the 3 wholesome healthy smoothies you can have for your breakfast
Step one – take the frozen banana and mango, put it in the blender. – Add the dry fruits, pea-nut butter, and milk. (use any one you like, I used plant-based milk (1/2cup), almond milk). – And keep it to blend until it turns out smooth and bit thick. (1-2 min)
Step two – Pour the blended smoothie into the bowl you desire to have the smoothie. – Add on the toppings: banana, mango, pomegranate, dry fruits, sprinkles some basil leaves, and mint to decorate:)
Step three – Serve yourself and your loved ones the most delicious, healthy Mango-banana smoothie.
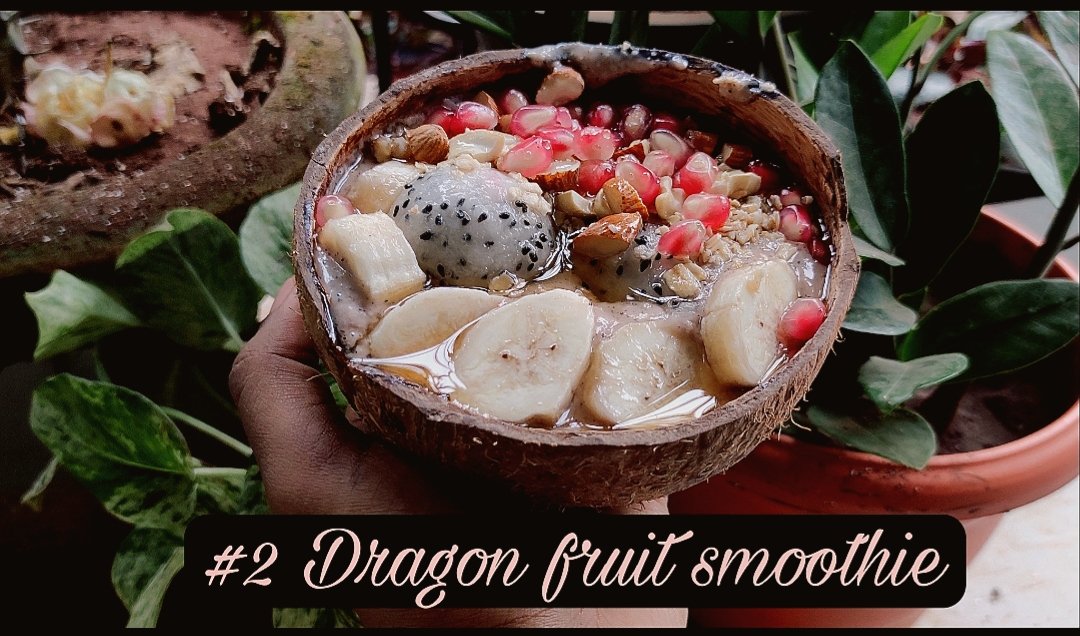
Step one – Peel and cut the dragon fruit. – Take the frozen banana and put it in a blender – Add dragon fruit, dry- fruit, pea-nut butter, milk (1/2 cup) (any of your choice), maple syrup(optional) and some honey. – Blend it till its smooth. Step two – Pour the blended smoothie into your bowl – Add on the toppings you prefer, I have used: banana, dragon fruit balls, pomegranate, dry fruits, and some generous amount of honey.
Step two – Pour the blended smoothie into your bowl – Add on the toppings you prefer, I have used: banana, dragon fruit balls, pomegranate, dry fruits, and some generous amount of honey.
Step three – Serve yourself and your loved ones the freshly healthy dragon smoothie.
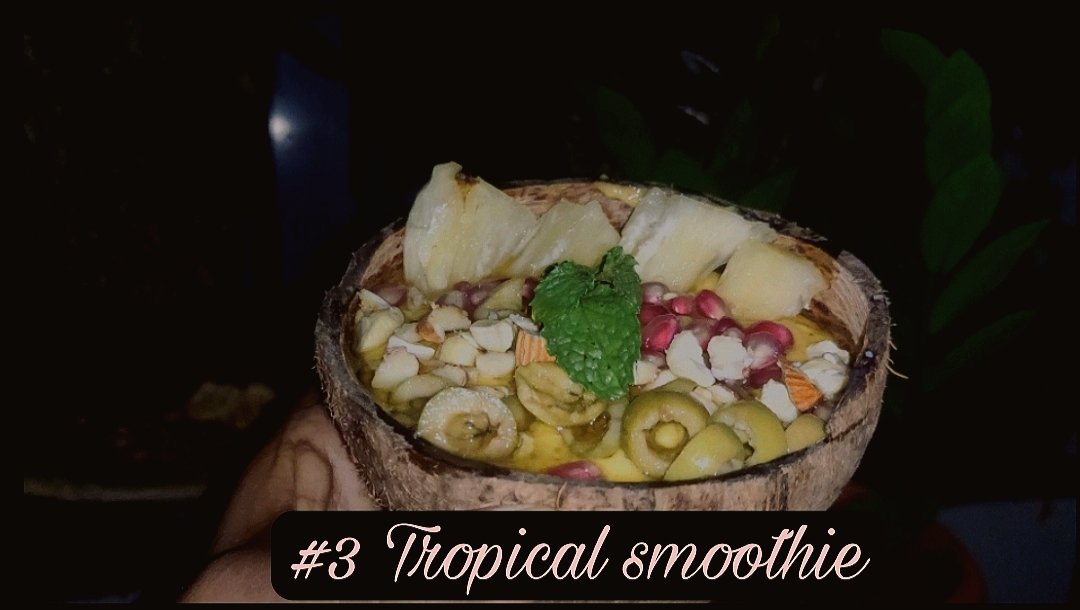
#3 Tropical smoothie
Tropical smoothie
Things that you will require: pineapple, banana, pomegranate, mango, dry fruits, pea-nut butter, olives, and honey.
Step one – Take the frozen banana, pineapple and mango and put it in a blender. – Add pea-nut butter, dry fruits, milk (very little) and some honey, – Add yogurt(optional), I used blueberry yogurt. – And blend it till it turns smooth.
Step two – Pour the blended smoothie into the bowl . – Add your toppings: pineapple, mango, pomegranate, olives, dry fruits, and some generous amount of honey.
Step three -serve yourself and your loved ones the delicious tropical smoothie bowl.
These are the 3 wholesome healthy smoothies!!!
I hope you will like it. Do give it a try!!
Below is the link to my YouTube video, do watch it!
I would LOVE to hear from you about how you have benefited from these 3 wholesome Healthy Smoothies. Share with your friends on Facebook, Whatsapp and Instagram. Thank you, as always, for your support.
I was in grade 5 when I was first Introduce to yoga, and had immense passion for it, but my classmates wouldn’t join along because they were under the impression that Yoga is a religion and belongs to Hinduism
Have you ever wondered whether yoga is a religion? Have you been in a situation where you wanted to practice yoga but hesitate to do so because you thought it’s a religion and didn’t want to be a part of it? Let me break it down- from yoga’s roots in Hinduism, Christianity and Buddhism, to its modern-day evolution as a spiritual and philosophical practice. We know one thing for sure- nobody knows when yoga began. However, yoga’s origin can be traced to northern India (Himalayas) over 5,000 years ago.
The birth of Yoga
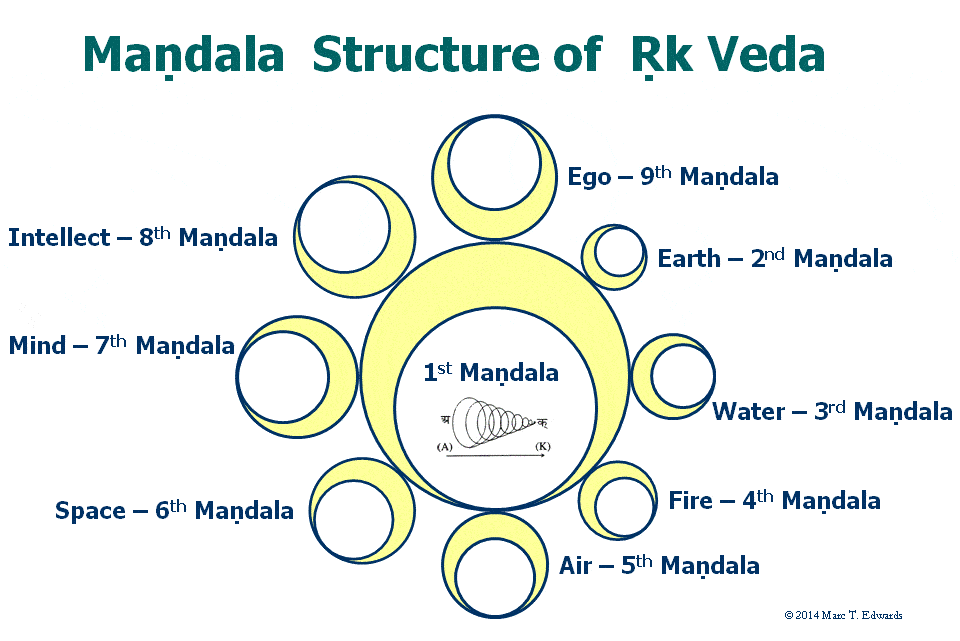
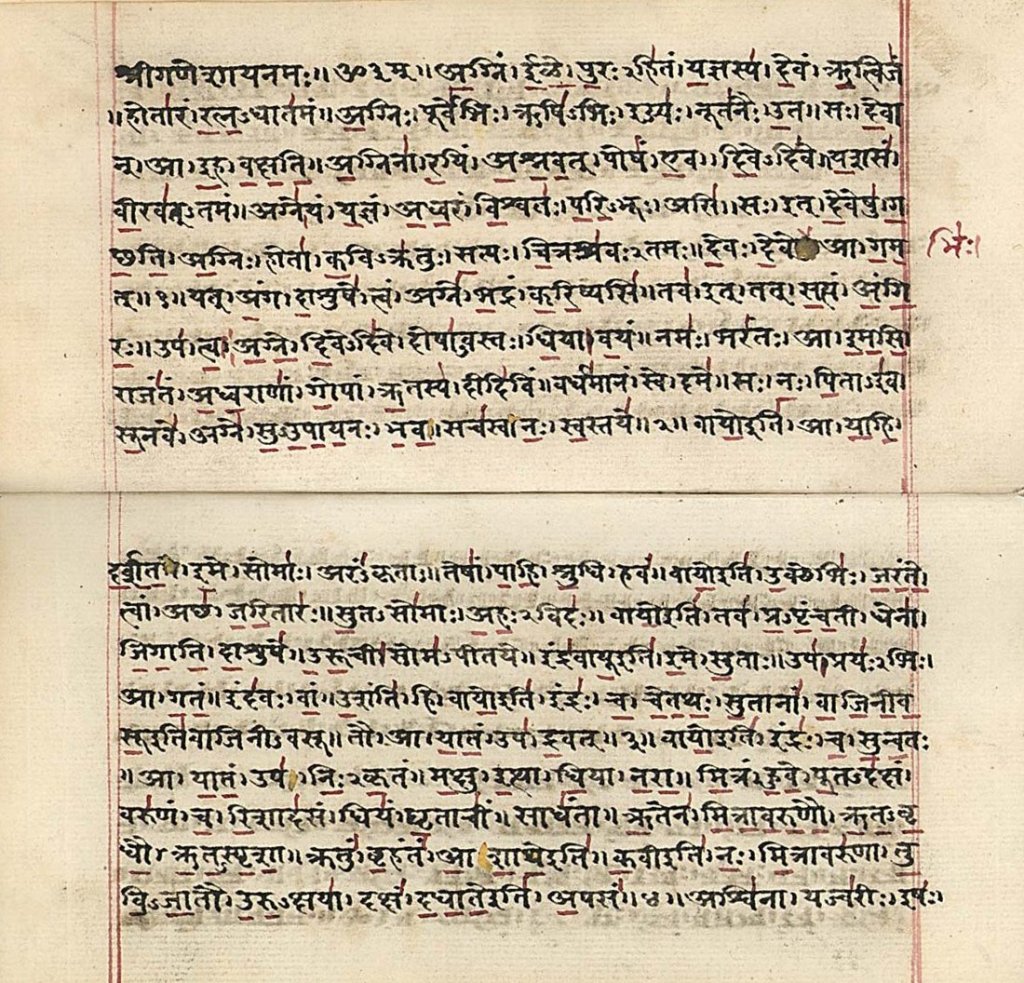
The word yoga was first mentioned in ancient sacred texts called the “Rig Veda“. The Vedas are a set of four ancient sacred texts written in Sanskrit. The Rig Veda is the earliest amongst the Veda’s and is a collection of over a thousand hymns and mantras in ten chapters known as mandalas, which were used by Vedic age priests. Yoga was refined and developed by Rishis (sages) who documented their practices and beliefs in the Upanishads, a huge work containing over 200 scriptures.
Mandala structure of Rig VedaRig Veda text in Sanskrit
Have you ever been for a yoga class or have you often heard a certain terminology they use while practicing yoga?
Like; Āsana, Prānāyāma…. What are thesewords? What do theymean?
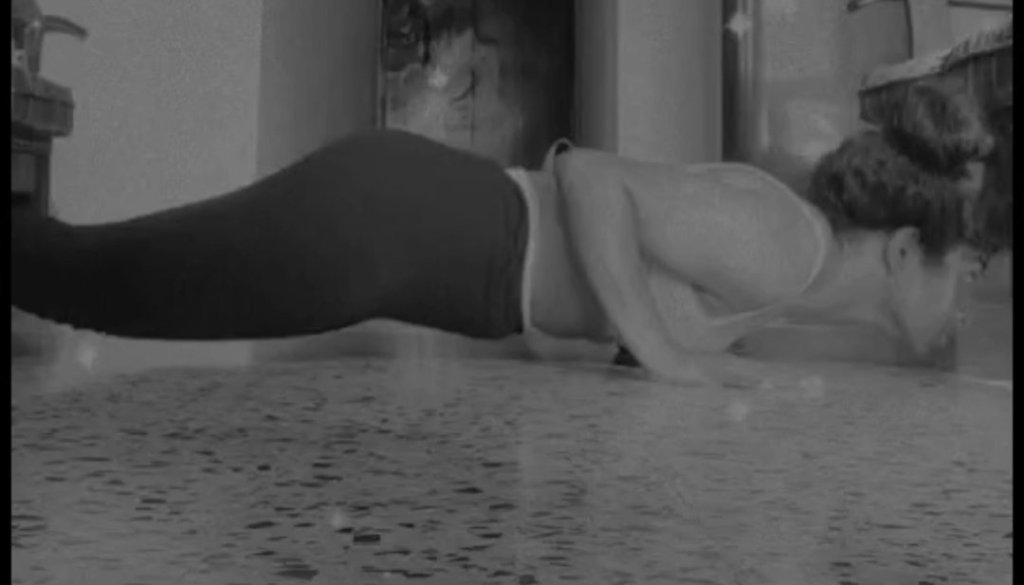
Āsana Literally translated as seat, the term āsana these days is used to refer to the practice of physical yoga postures or poses. For example, Caturaṅga Daṇḍāsana Caturaṅga Daṇḍāsana is a posture commonly referred to as “low plank”. It requires arm, shoulder and core strength. It is often performed before lifting the chest up to “upward-facing dog”.
Low plank pose
Prānāyāma Prāna in Sanskrit refers to the life force within every being. In relation to modern-day yoga classes, the term prānāyāma is used to describe breathing exercises, which clear the physical and emotional obstacles in our body to free the breath.
For example, Ujjayi Commonly translated as “victorious breath”, ujjayi breath is performed by restricting the air flow at the back of the throat, while breathing in and out of the nose. This creates a note on exhalation, often compared to the sound of the oceans.
Performing Prayanama
Now, let’s clarify about, ‘The yoga poses’
When starting with yoga, there will be certain postures which become the foundation of your yoga practice. Anchoring your practice with these postures allows you to reap the benefits of yoga – flexibility, improved muscle strength, protection of the spine, increased blood flow, and even improved happiness.
It is believed that there are 19 different types of yoga and 66 basic yoga postures.
In bringing yoga to diverse and global audiences, Swami Vishnudevananda kept in mind the lifestyle needs in current times, so he adapted the ancient wisdom of yoga into five basic principles: Proper Exercise (Āsana), Proper Breathing (Prāṇāyāma), Proper Relaxation (Śavāsana), Proper Diet (Vegetarian) and Positive Thinking & Meditation (Vedānta & Dhyāna).
What role does mantras play in the practice of Yoga?
Mantras are repetitive sounds used to “penetrate the depths of the unconscious mind” and “adjust the vibration of all aspects of your being”. Mantras can be chanted aloud, delved upon, or listened in to.
In yoga, mantras are typically chanted in Sanskrit. The Sanskrit word mantra is derived from the root word “man”, meaning “to think,” and tra (from trai) meaning “to protect or to free from bondage” or “to free from the mind.”
The earliest mantras were composed in Vedic Sanskrit in India, and are at least 3,000 years old. Mantras now exist in various schools of Hinduism, Buddhism, Jainism, and Sikhism. They come in many forms; typically, they are melodic, and have mathematically structured meters. The sounds “Aum” or “Om” are some of the most basic of mantras.
On more sophisticated levels, mantras are melodic phrases with spiritual interpretations. These can be many things, such as a human longing for truth, reality, light, immortality, peace, or love. Some mantras have no literal meaning, but are meaningful in a spiritual way.
So, why do yogis chant Aum or Om?
The “AUM” symbol (or OM – the symbol in the center) symbolises the Universe and the ultimate reality. AUM is considered an original (primal) sound that rang out in the creation of theuniverse.
While Om may not be a part of your yoga class, many yoga instructors start and end their class by chanting Om. But, if it’s not a part of practice, simply meditate in silence while others move in vibration with the chants. If you’re practicing yoga in a class and don’t want to chant Om it’s completely fine, but please be mindful and do not leave the class while the chant is on.
Is yoga connected to religion?
Anybody practicing yoga will often be asked, ‘how is yoga related to religion?’ Although yoga is not a religion in itself, it is connected to religion, and stems historically from Hinduism, but also to Jainism and Buddhism. Both Buddhists and Hindus chant the sacred mantra ‘Om’ during their meditation. ‘Om’ is said to echo the sound of harmony in the universe. You can chant ‘Om’ however, without being a part of a religion, as the mantra isn’t necessarily religious, but more about feeling connected to other people.
“Yoga is spiritual practice and not a religion”
Note:
Whether you see yoga as a sport, a mediation, a struggle to reach to your toes or a struggle to do you handstands and back bends, or just a relief from your anixety and mental health. Remember that there’s inner sanctity in you somewhere.
Have you ever been in that situation where you stumble upon easily and have no control over your body or on your body weight? Do you know why it happens? It’s simple because most of us are lacking in core strengthen. Further, I shall explain to you why is core strength important.
Why is core strength Important?
The core is at the centre of your body, it encompasses your abs, hips, back, and chest. Your core stabilizes your body, allowing you to move in any direction as well as having proper balance. It helps prevent falls and supports your body. So, having a strong core is beneficial to everyone because it allows your body to function properly. Words by Dr. Brenda Higgins, D.C.
Improves balance and stability The Core exercises train the muscles in your pelvis, lower back, hips and abdomen to work together. This leads to better balance and stability making daily activities such as walking, running, and sitting much easier. This will help eliminate any injuries, keeping your body aligned and minimizing strain on your muscles and joints.
Eliminates back pain We often find ourselves struggling with back pain. It most happens because we sit continuously or stand or maybe because of our bad posture. Since the core is at the centre of the body which supports your entire body especially the neck and the back. Strengthening your core is important as it will align and upright your body and will have very less impact on your neck and back.
Upright Posture Good posture lessens wear and tear on the spine and allows you to breathe deeply making it easier for oxygen to travel through your muscles so they are able to contract.
HERE ARE 13 YOGA POSES/ EXERCISES TO STRENGTHEN YOUR CORE
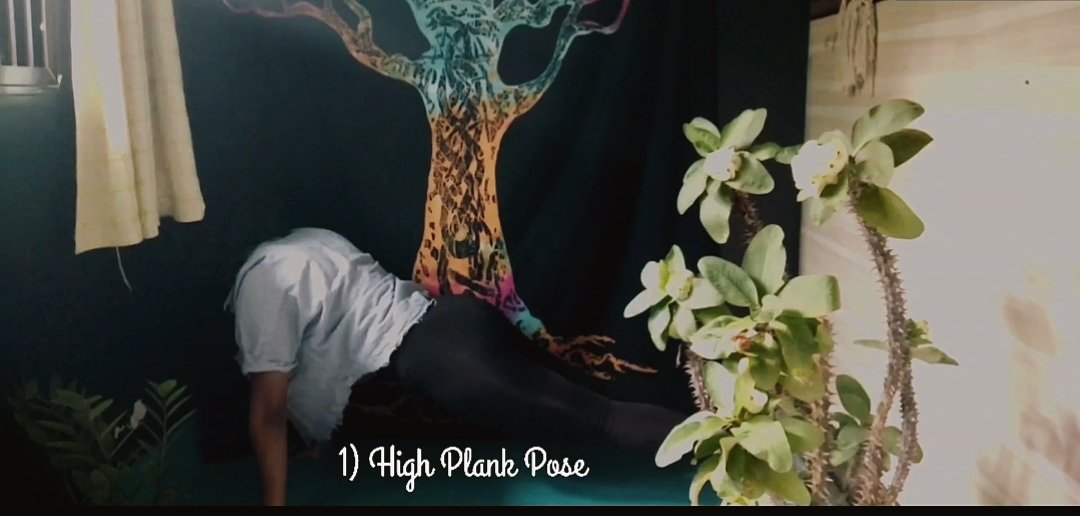
1) High Plank Pose
Instructions:
– We start in Adho Mukha Svanasana.Then inhale and draw your core forward until the shoulders are directly over the wrists, core parallel to the floor. – Press your outer arms inward and firm the bases of your index fingers into the floor. Firm your shoulder blades against your back, then spread them away from the spine. Also spread your collarbones away from the sternum. – Press your front thighs up toward the ceiling, but resist your tailbone toward the floor as you lengthen it toward the heels. Lift the base of the skull away from the back of the neck – Remember tighten your lower abdomen while doing this exercise. – Hold this for 30secs
Benefits • Strengthens Your Core. … • Increases Muscle Definition. … • Heightens Metabolism. … • Reduces Back Pain. … • Gives You Better Posture. … • Improves Balance. … • Enhances Bone and Joint Health. … • Boosts Mood and Relieves Stress.
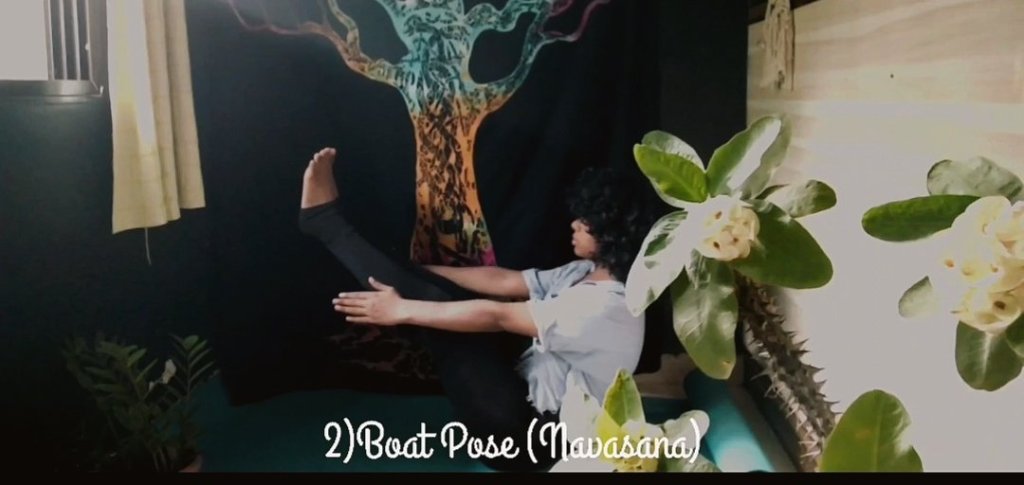
2) Boat pose (Navasana)
Instructions:.
– Begin in a seated position with your knees bent and your feet flat on the floor. -Lift your feet off the floor, slowly. Keep your knees bent at first. Bring your shins parallel to the floor. -Your core will naturally fall back, but do not let the spine round. -Straighten your legs to a 45-degree angle if you can do so without losing the integrity of your upper body. You want to keep your core as upright as possible so that it makes a V shape with the legs. -Straighten your arms roughly parallel to the floor with your palms turned up. -Do your best to balance on the seated bone, but it’s normal if you are resting slightly behind them. Focus on lifting your chest to support the balance. -Sit in this position for 30sec
Benefits •Boat Pose builds abdominal and core strength. It works the deep hip flexors. These muscles get weak when you sit too much. It will also help you build your balance.
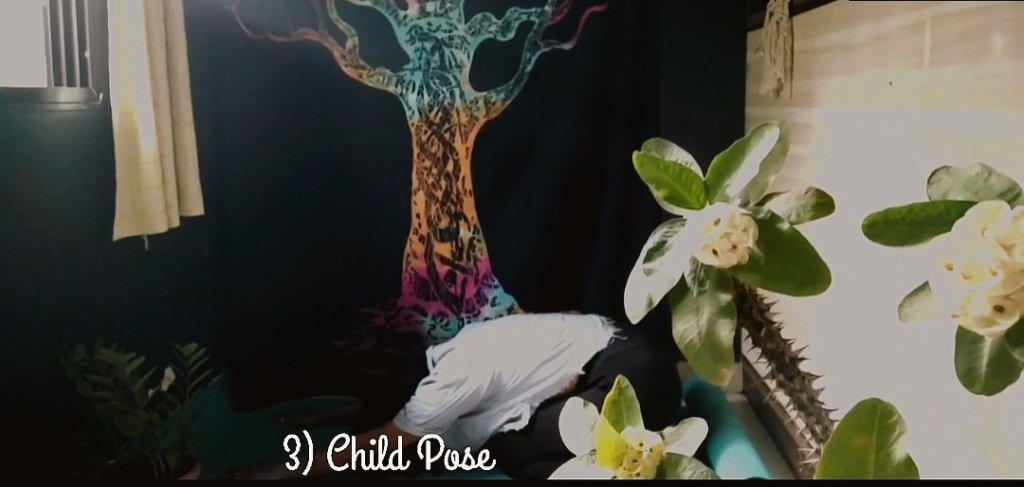
3) Child pose
Instructions
– We start by kneeling down and resting your butt on your heel .
Gently, bring your belly facing towards the floor, resting besides your thighs
– Place your hand forward
– Hold this position for 30secs
Benefits
Child’s Pose is a gentle stretch for the back, hips, thighs, and ankles. It can help relieve back pain.
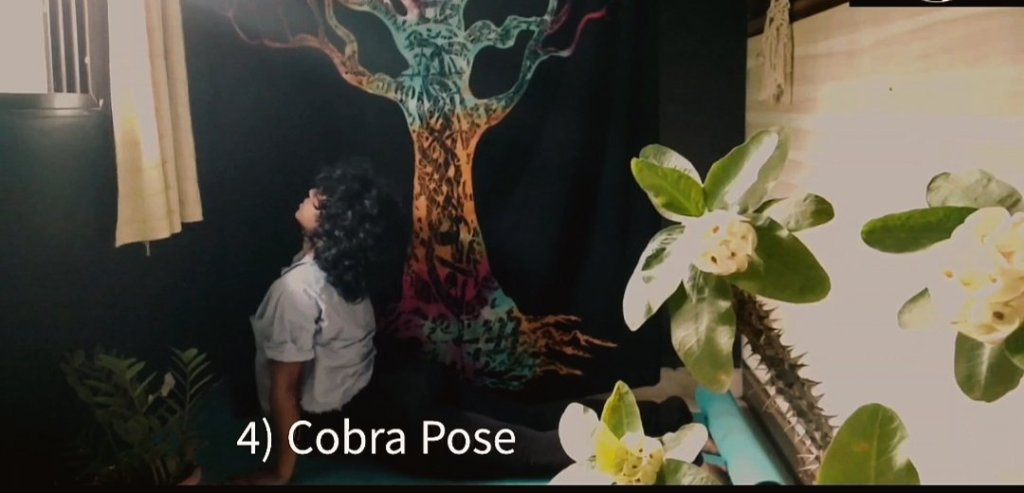
4)Cobra Pose (Bhujangasana)
Instructions:
-Lie on your belly.
– Come onto your forearms, with your elbows directly under your shoulders and parallel to each other.
–Stretch your legs straight back, about hip-width apart.
–Spread your toes wide and press the tops of your feet into your mat.
– Firm your legs, and roll your inner thighs up, your outer thighs down. Press your tailbone toward your feet, lengthening your lower back.
-Tighten your abdomen and stretch as much as possible
–Press down into your forearms to lift your chest up.
– Hold this position for 30secs.
Benefit • strengthens the spine. • Stretches chest and lungs, shoulders, and abdomen. • Tones the buttocks. • Stimulates abdominal organs. • Helps relieve stress and fatigue. • Opens the heart and lungs. • Soothes sciatica. • Therapeutic for asthma.
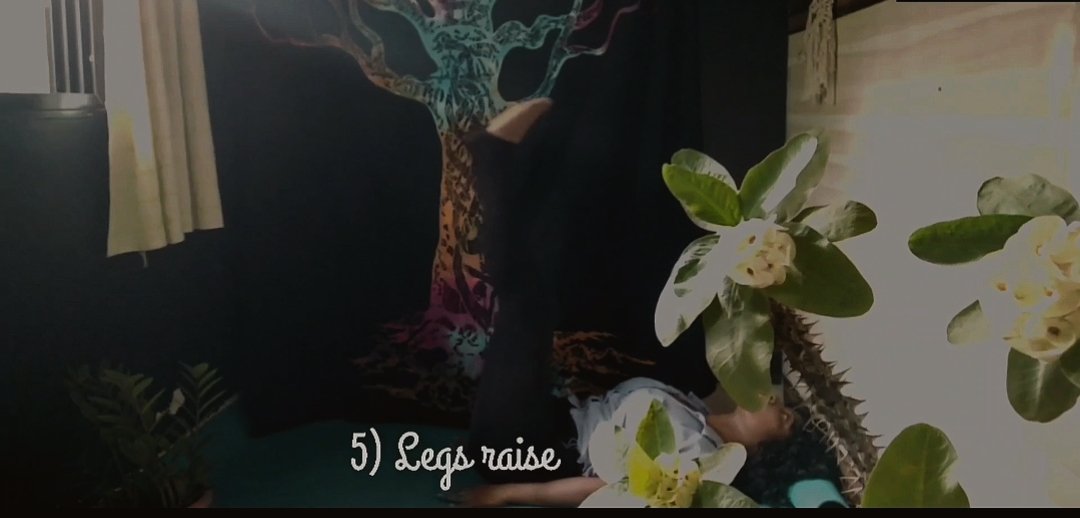
5) LEG RAISES (UTTANPADASANA)
INSTRUCTIONS -lay down on your back -place your hands besides your glutes -gently raise your legs,inhale and hold for few secs -gently bring your legs down and exhale. keeping your core enganged throughout. – do this for 30 secs.
BENEFITS Studies have been proven that, practicing of Uttanpadasana on a regular basis can improve the strength of the abdomen organ. • Cures back pain • Improves function of reproductive system • Increasing blood circulation
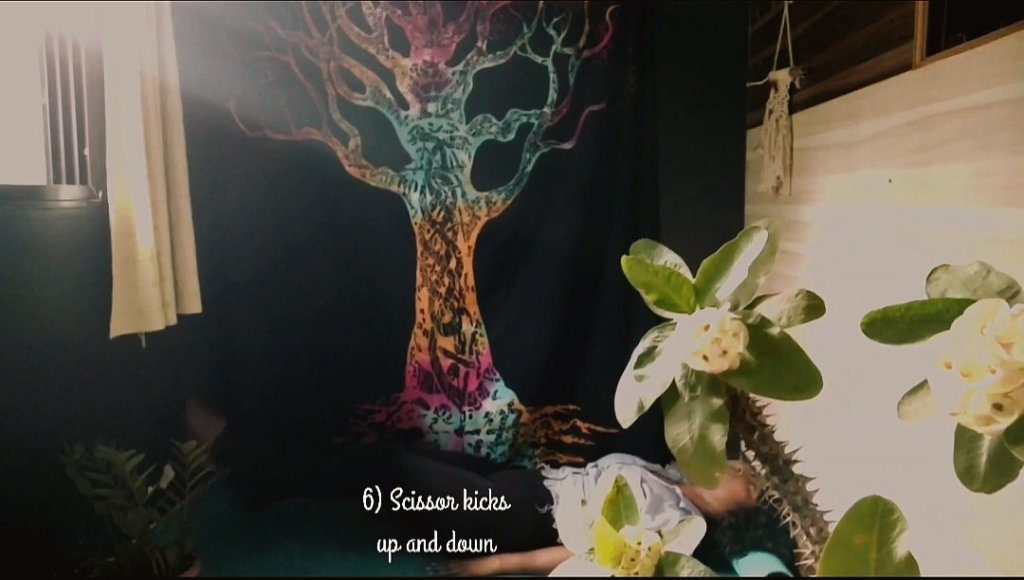
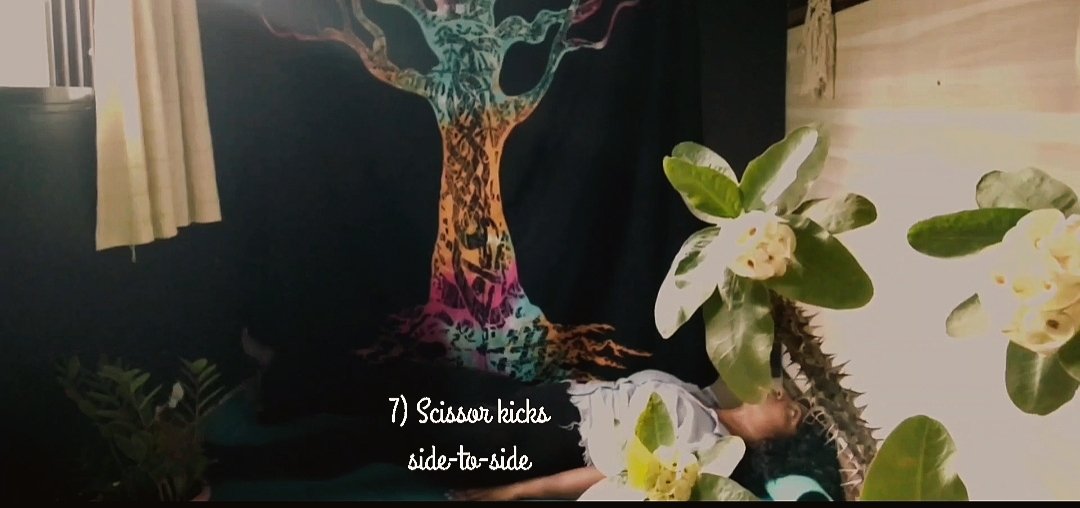
6)SCISSORS KICKS
Instructions:
-Lay on your back on the mat with your legs extended out in front of you. Place your arms by your sides, palms down. You can also place your hands under your glutes below the small of your back, palms pressing into the floor. -Engage your core by pressing your lower back into the mat and tucking your pelvis. Maintain this position during the entire movement. -Lift both legs off the ground about a 10 -15-degree angle. – the scissoring motion by slowly switching your legs up and down for the recommended number of repetitions. – this for 30secs
– Do the same for the other leg as well.
Benefits – Strengthens your core, hamstrings and glutes.
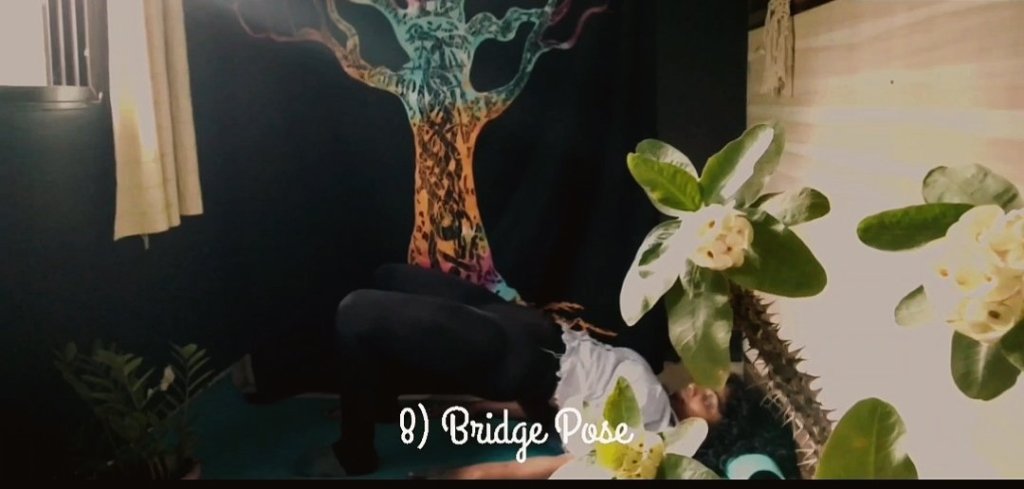
8) Bridge pose (Setu Bandha Sarvāṅgāsana)
Instructions:
-lay on your back with your knees bent, hips wide apart and hips directly under your knees. Leave your upper arms on the floor and bend your elbows alongside your ribs, pointing your forearms and fingers toward the ceiling. -Gently move your hips upwards and downwards -Do this for 30secs.
Benefits • Stretches the chest, neck, and spine. • Calms the brain and helps alleviate stress and mild depression. • Stimulates abdominal organs, lungs, and thyroid. • Rejuvenates tired legs. • Improves digestion. • Helps relieve the symptoms of menopause.
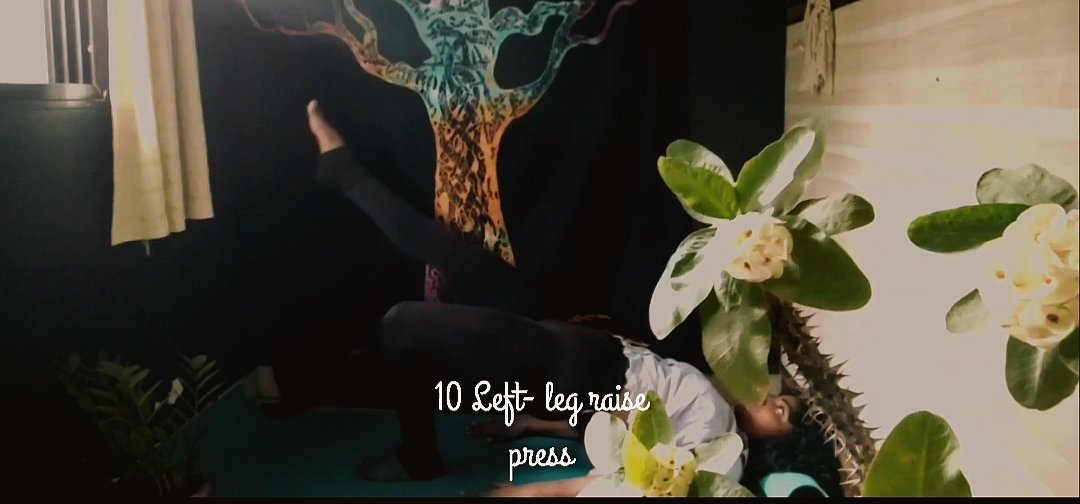
9) Single leg press
Instructions:
-Lay on your back and bend your knees so your feet rest flat on the floor. -Then raise one leg until it is stretched out straight. -Brace yourself, then drive the heel of the foot still grounded into the floor and push your hips up until your body is in a straight line from your shoulders to the toes of your outstretched foot. Slowly lower yourself again, then repeat on the same side.
– repeat the same for the other leg as well -do this for 30 secs each leg
Benefits • Strengthens your abdomen, hamstrings and activates your glutes.
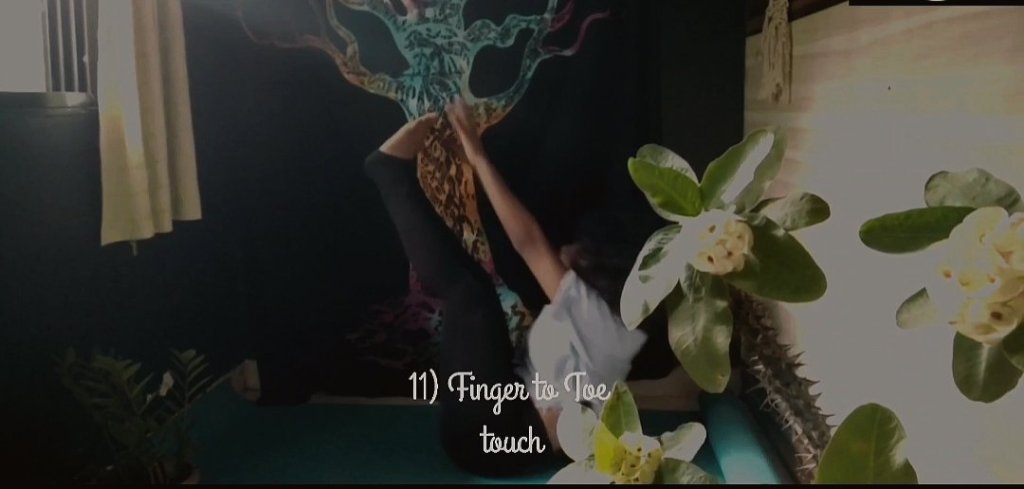
11)Finger to toe touch
– Lay your back and raise your legs in about 90degree – Gently lift your upper body and try to reach to your toes. – Remember to engage your core throughout – Do this for 30 secs.
Benefits • Increases hamstring flexibility, touching your toes displays flexibility in your lower back, glutes, ankles, and hamstrings.
12) Heel to heel touch
Instructions – Lay down on your back and blend your knees, (knees facing the celing) – Then gently move your bodyside to side, letting your fingers touch your heels. – Keep your core engage throughout. – Do this for 30secs
Benefits
• It strengthens the obliques muscles
-The obliques are located on the side and front of the abdomen and strengthening these muscles can help tighten the entire side ab wall effectively.
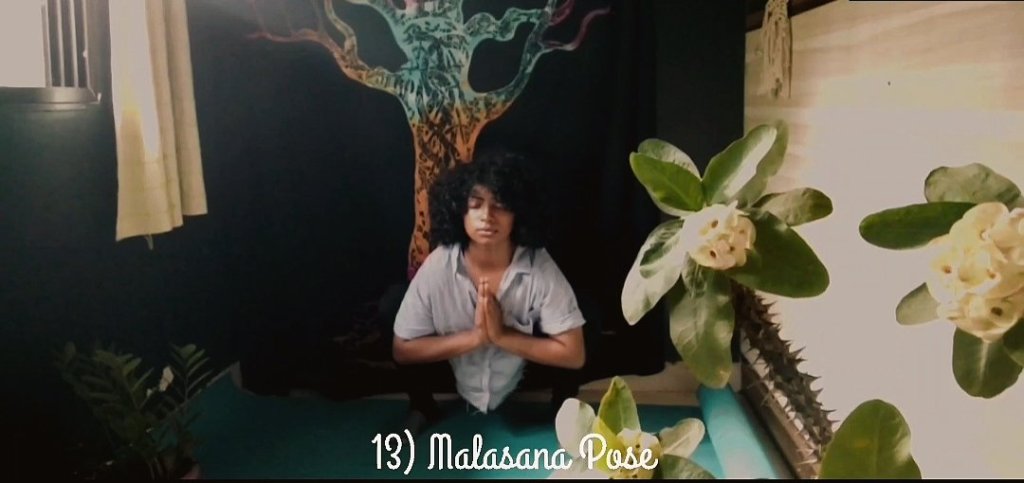
13) Malasana (Garland Pose)
Instructions:
Ft-We begin with a squat position with the feet as adjacent together as probable. – both palms together in front of your chest in a prayer position. – the elbows against the inner shins or knees to create confrontation between the elbows and your inner legs -hold for 30 secs
Benefits •The Malasana or the Garland Pose helps to stretch the groins, back, and ankles.
These are 13 Yoga poses/exercise that you can try out at home in your own comfort. The best time to practice yoga is early in the morning or late in the evening. To get your desired outcome, practice these poses/ exercise for a month and see the changes in your body.
I have done full core strengthening video, you can head over to my YouTube channel to watch the same. Here is the linkhttps://youtu.be/0C7ZSVl2Fw4
If any clarification you can type them down in a comment section.
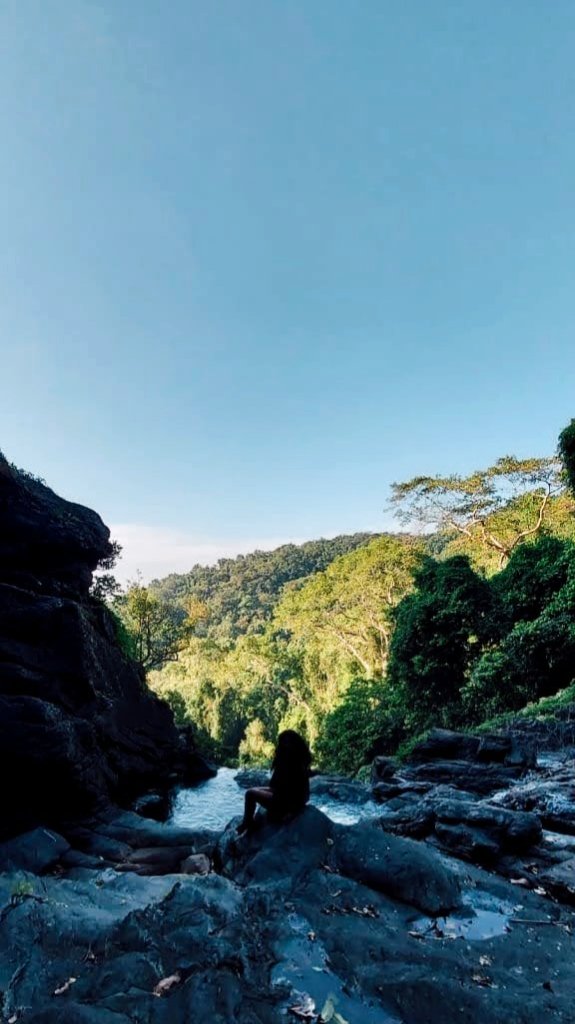
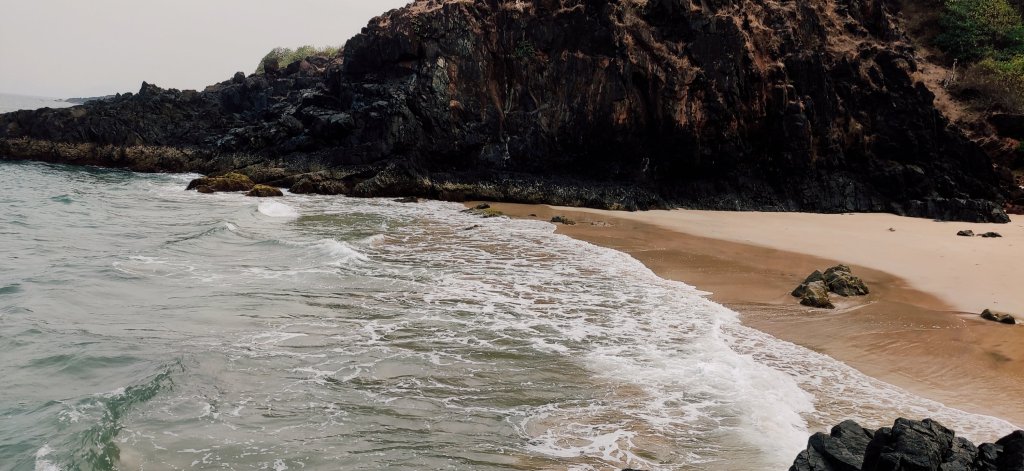
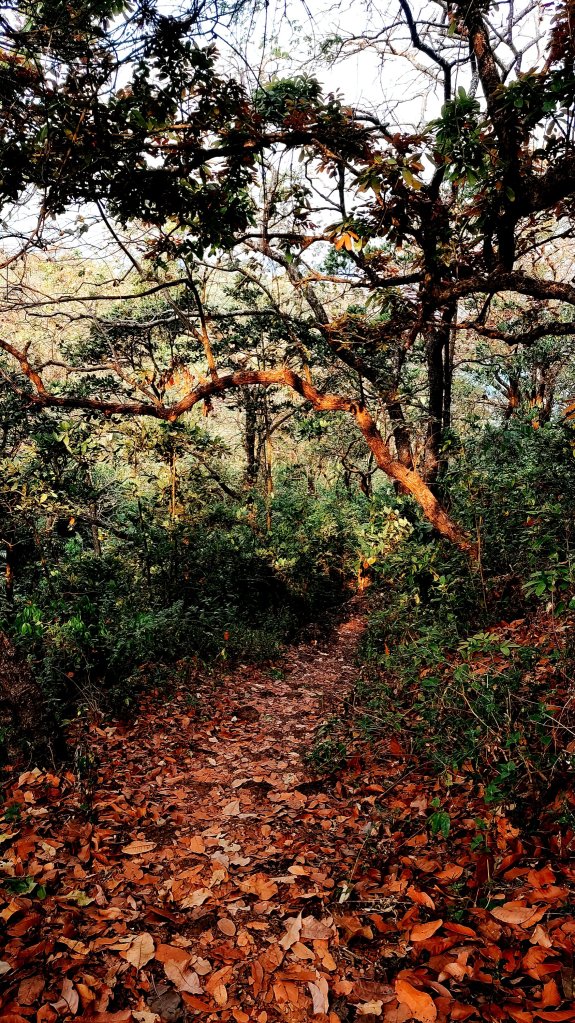
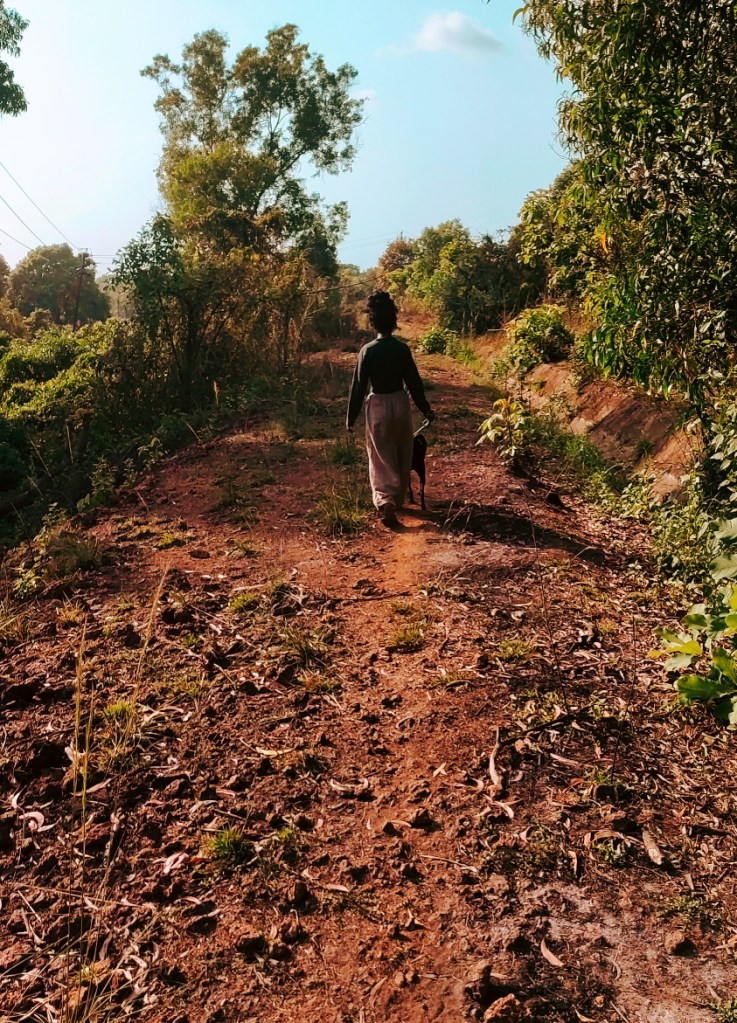
I live in a beautiful paradise situated on the south-western part of India, Goa. It is a state blessed with spectacular beaches, waterfalls, dense forest, and many beautiful undiscovered places. As the introduction about myself says I’m an adventurous person, and hungry to discover new places. This time, I chose to discover an unknown beach in the wonderful village of canacona and planned to camp on a beach side!
The beach where we camped.Lushy thick forest, we had to trek on this trail to reach our destination.
Trekking down the mountain, reaching to sea sand, and watching that majestic sunrise, sunset, moonrise and moon-set was one of the most magnificent experiences I have ever had.
Oh well, camping at the beach sounds super fun and exciting, but would you like to camp on a wild beach where one can find wild animals? Wouldn’t you be scared? Considering there’s no one around you?
Splendid! It was a full moon night when I along with my brother and two of his friends planned to camp at this admirable, undiscovered beach (kind of an island). Having those goosebumps while trekking down the rocks, we finally reached our destination and started exploring the other parts of the land. We realise that time just passed by as we were connecting ourselves with the elements around us, I mean , the harsh waves certainly gave us a different rhythm to our souls, the vibes, there was pleasant, cool and calm, the sunset illuminated us with it’s different shades of orange, red and pink color.
THINGS TO KNOW BEFORE YOU GO CAMPING AT A WILD-BEACH!
1) Carry limited stuff While camping at the beach you should carry whatever is required, carrying anything extra will leave you with a burden because you wouldn’t be able to hike/ Trek properly, also there are chances that you may slide down at any moment because of imbalance of your body and the luggage weight.
2) Carry tent which is green or brown is color If you prefer going for camping in a wild, Green or brown color tent is highly preferable/ recommended. The reason being is because, since it’s a wild area there can be high chances that there will be wild animals, therefore, to protect yourself from any danger you are advisable to get the green/brown tents so it can camouflage with the environment around you.
3) Pitch your tent near the trees or near the rocks Having a dreamlike stay near the beach-side is every adventurous person’s wish, perhaps you should also keep in mind about your safety. Pitching a tent near the edge of the sand and the rocks is safe. You’ll be safe from wild- animals.
4) Carry essentials camping tools Essentials camping tools- torch, compass, maps, pocket knife, first-aid box, headlamp are must to have with you when you’re in the wild-camping. Even though you have your smartphone with you it will not guarantee you that it will last for long, that’s the reason maps and compass could be a great help, if you ever get lost in the middle out of nowhere.
5) Limit your crowd It’s advisable to go with the smaller group of friends than go with a larger group of friends. Going with many people will make the place noisy and will create disturbance for other living organisms/ animals around that environment.
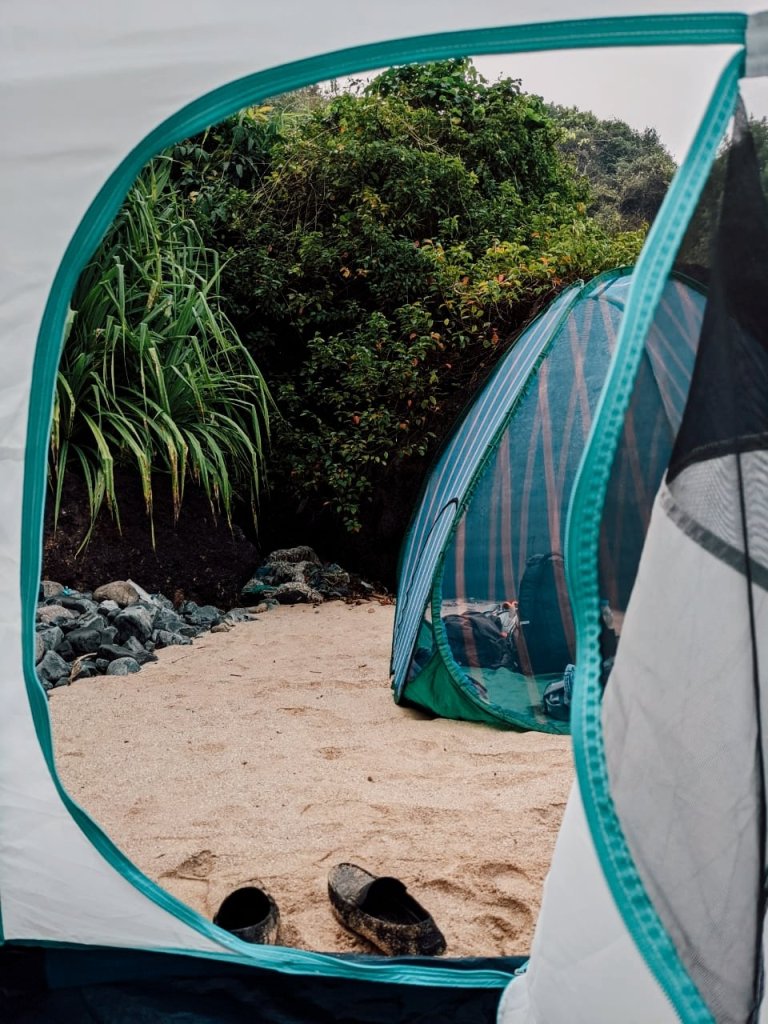
Below are some pictures of our camping site.
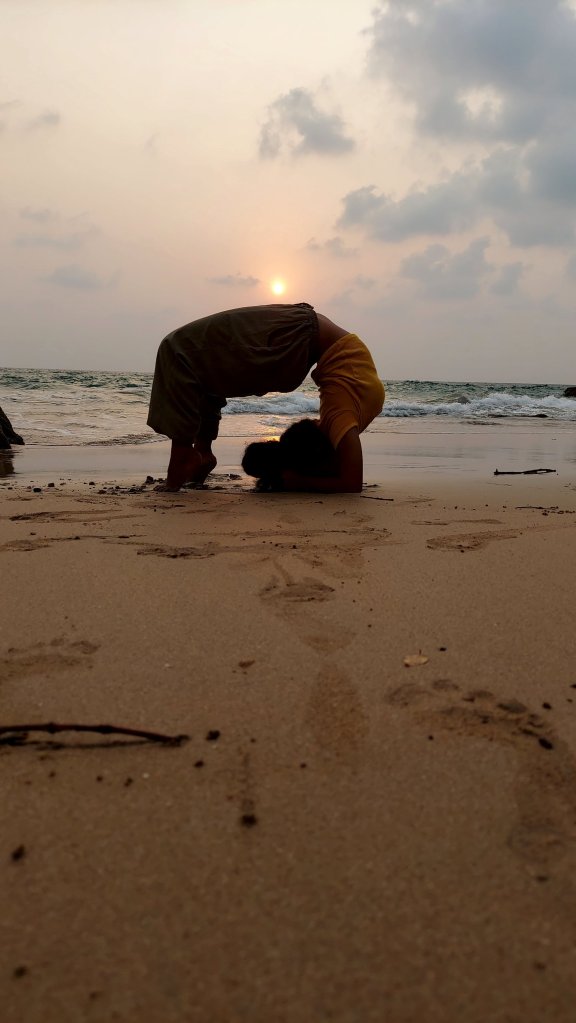
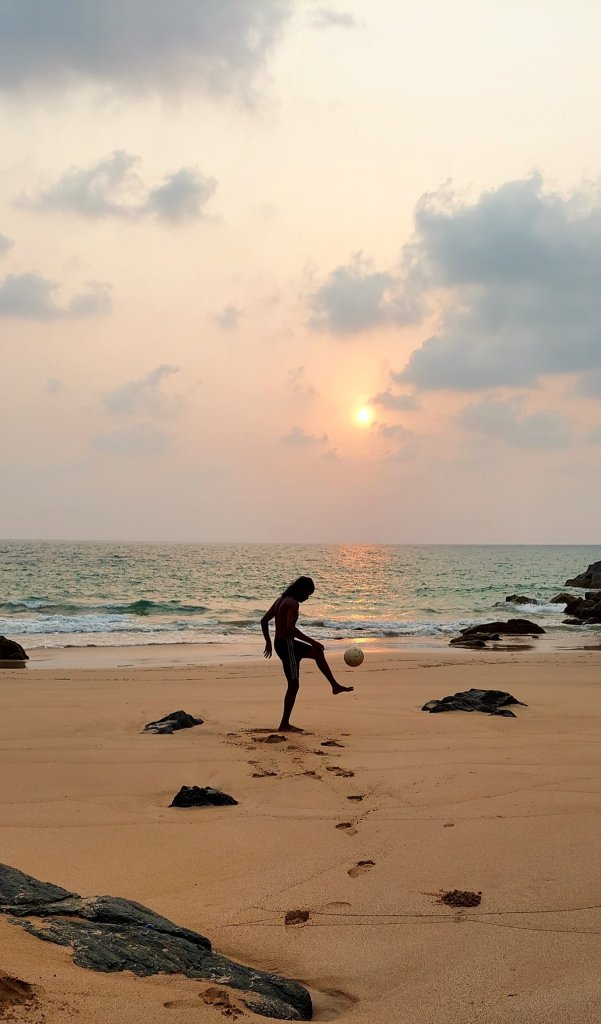
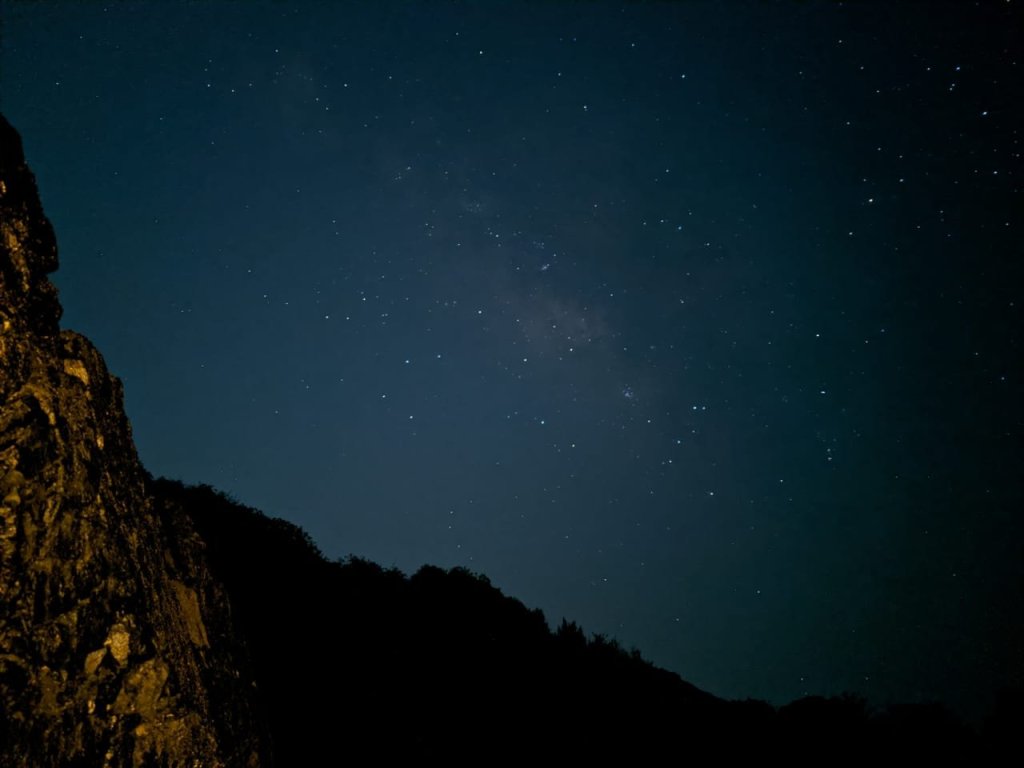
Pitching the tent near the treesPerforming chakrasana (wheel pose) while the sun sets.Playing football while watching the sunset.Capturing the full moon.Capturing the milkywayEmbracing the morning waves and the scenic view.
Performing vinyansa Flow As I woke up early that morning, I came out of my tent, watched the beautiful moon set and sooner started practicing my yoga, paying attention to those claming waves clashing from different directions was a wonderful feeling!!
Early morning vinyansa Flow
If you like this post, please do like, comment and share.
My name is Yannisa Gonsalves, writer of this blog! I am a Yoga practitioner and an adventurous person. I have been a very enthusiastic traveler and a dynamic athlete from a very young age. I would really like to share my experience with you all! So, prepare to be amazed by the scenic route of my Yoga World.
My first blog ~ Yin Yoga
“Yin Yoga is an art form not an exact science. The purpose of Yin Yoga is to take us out of the system of social convention, indoctrination, and mechanistic ways of thinking, not to reinforce them by demanding conformity to rigid, limited paradigms. The practice of Yin Yoga poses does not require scientific approval or validation. Intellectualizing the practice of Yin Yoga serves to obstruct a deeper understanding of its essence. The real power to authorize truth is contained within each and every one of us” -Master Paulie Zink ~the founder of Yin Yoga
What is Yin Yoga? Yin Yoga is a slow-paced style of yoga as exercise. Yin yoga is not a new practice. Holding postures for long periods of time in stillness are prescribed in the earliest Hatha Yoga texts. Beginners may be able to hold on to each posture for 30-45sec whereas an advanced yogi will be able to hold on to each posture for 3 – 15 min.
The Benefits of yin yoga
-Increase flexibility. -Improves range of motion. -Eases aches and pains -Improves posture. -Speeds up recovery -Reduces injuries. -Improves focus and concentration -Reduces anxiety -Builds discipline -Relieves stress -Calms the mind. -Promotes relaxation and restoratives sleep -Boosts creativity.
5 YIN YOGA POSES YOU MUST TRY
puppy pose
Puppy pose
-Puppy pose loosen the spine and stretches the lats, shoulders, and triceps. -Keep your hips directly over your knees. -Face your chest towards the yoga mat and drop your forehead gently forward. Let your neck be relaxed. Keep a slight curve in your lower back. Feel a nice stretch through the arms while pulling your hips back towards your heels.
Child Pose
Child pose -Child pose is one of my favorite pose, it stretches the upper back and shoulders. -To do this pose gently sit back comfortably on your heels, stretch your arms forward and let go all the tension from your body. Breathe deeply into the front, back and sides of your ribcage.
Happy Baby
Happy Baby
-Happy baby stretches the glutes, groin, and hamstrings. -Hold your feet, if you can’t reach your feet, it’s absolutely fine you can either hold your ankles or shins. -Rock gently from side to side.
Malasana (Garland Pose)
Garland Pose opens the hips and groins as it stretches and strengthens the feet and ankles. -stand with your feet about mat’s width apart. Bend the knees and lower your butt toward the floor to come into a squat. -Take your upper arms inside your knees and bend the elbows to bring the palms together into anjali mudra (prayer position). -With hands to your heart center in anjali mudra, continue pressing upper arms into thighs and thighs into upper arm to stay engaged. -Keep your spine straight, your butt moving toward the floor, and your shoulders relaxed away from your ears.
Saravanan Pose
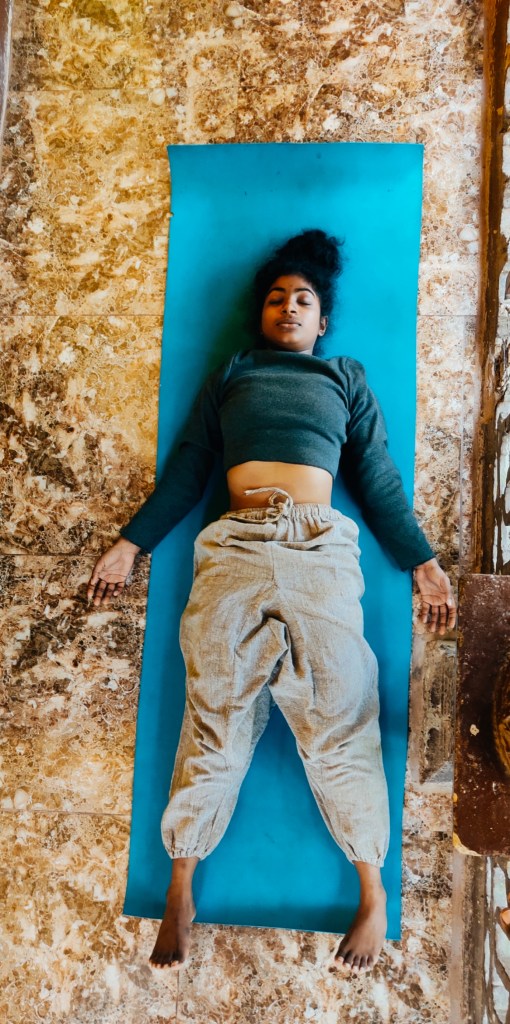
Sarvanana ( resting pose) Release your arms and legs and lie back in Sarvanana pose.
Thank you for reading this blog, as you have read the above Asanas and now know the benefits of it, I’d really appreciate if you practice it atleast once a day. And, if you’re a person who always spends most of the time sitting on a chair due to work, then this asanas is highly recommended as it will help you to ease your lower back pain.
If want to know more about the above asanas please feel free to type in the comment section and I will be happy to help you!:)
You can get in touch with me through my email- yannisagon20@gmail.com or Instagram Id @yannisagonsalves
If you like this blog please like, comment and share this post.